Showing posts with label homemade marshmallows. Show all posts

Tuesday, March 13, 2012

Homemade GooGoo Clusters


The Setting: Gloomy day, but warm enough to leave the ski mask at home.

The Soundtrack: Hoosband flipping through papers and working out figures on the calculator. Hooray tax time!

Steaming up the Oven: Bread.

The Scenario: We're in the home stretch for Music City in the Midwest, with our second-to-last recipe, Homemade GooGoo Clusters.

In 1912, Nashville's Standard Candy Company brought the world its very first mass-produced combination candy-bar.

In a world of plain-Jane candy bars made exclusively of chocolate or taffy, the GooGoo Cluster proudly combined chocolate, marshmallow, caramel, and peanuts in a confection so tasty people would start asking for it from birth--that's right, the next time you hear a baby say "Goo Goo," you'll know what he's clamoring for.

My version uses dulce de leche instead of caramel (because it's easier to make, easier to work with, and pretty freaking delicious) and honey-roasted peanuts for an added flavor bonus.

This recipe is dedicated to my daughter, Oia, who is expressing her share of goos and gahs these days, and to the memory of my grandparents, who always had a stash of GooGoo Clusters somewhere in the house.


Homemade GooGoo Clusters
This recipe uses the same Marshmallow Cream recipe as the Homemade MoonPies, also featured in Music City in the Midwest.

1/3 cup powdered sugar, for sprinkling and rolling
1 1/2 cups cold water, divided
3 (1/4-oz) envelopes unflavored gelatin
2 cups sugar
1 cup light corn syrup
1/4 cup sweetened condensed milk
1/4 tsp kosher salt
1 tsp pure vanilla extract
3 cups dulce de leche
1 1/2 lbs honey-roasted peanuts
16 oz semisweet and/or dark chocolate, divided
16 oz milk chocolate, divided
4 1/2 T coconut oil, divided

Make the Marshmallow Cream: Prop up each of two disposable pastry bags in each of two tall drinking glasses and fold the tops of the bags down a few inches (as if you were going to turn then inside-out). Set aside.

Line your counter with parchment paper and sift half the powdered sugar over the parchment.

Sprinkle the gelatin over 3/4 cup cold water in the bowl of an electric stand mixer fitted with the whisk attachment.

Fix a 3-quart saucepan with a candy thermometer so that the bottom of the thermometer is just above, not touching the bottom of the pan. Make sure the thermometer is set to Fahrenheit. Add the sugar, corn syrup, sweetened condensed milk, salt, and remaining water to the pan and bring to a boil over medium heat. Do not stir. Continue cooking until the thermometer reads 231 degrees F. The mixture will be light-golden-to-pale-amber in color. Remove from heat, turn the mixer on low, and very slowly and carefully stream the sugar mixture into the gelatin mixture.

Add the vanilla and increase the speed slightly. Continue increasing the speed slightly every 30-to-60 seconds until the speed is set to high. Beat on high until the mixture is white, fluffy, and voluminous and the bowl is almost cool to the touch, about 6 minutes.


Split the mixture between the two pastry bags, and pipe rough 1 1/2-inch puffs onto the prepared parchment.


Sprinkle with remaining powdered sugar, and roll each puff gently in the powdered sugar to coat (this will prevent the puffs from sticking to each other and make them easier to handle.


Top each puff with about 1 T dulce de leche.


Place the peanuts in a bowl. Press each puff, dulce-de-leche-side down into the peanuts so that the nuts cling to the dulce de leche.


Prepare the Chocolate Coating: Place 6 oz semisweet chocolate, 6 oz milk chocolate, and 2 T coconut oil in a medium-sized, microwave-safe bowl. Microwave for 30-second intervals, stirring thoroughly after each, until the chocolate is almost completely melted. Stir till completely melted and smooth.

Line your counter with clean parchment paper.


Gently press each cluster, marshmallow-side down, into the chocolate so that the chocolate coats the bottom. Allow the bottom of the cluster to gently graze the side of the bowl to remove excess chocolate as you transfer the cluster to the parchment paper to set.


Once set, transfer the clusters to a cooling rack and set the rack over the parchment paper.

Prepare remaining chocolate ingredients as before.

Spoon chocolate over each cluster, using the spoon to help you coat the top and sides, getting the chocolate into every nook and cranny. Let set.


Use an offset spatula or a wide, flat cheese tool to help you remove the fully set clusters from the cooling rack without cracking the chocolate.

Store clusters in a plastic zip-top bag at room temperature for up to 1 week.

Makes approximately 50 clusters.


Guest Feedback:
Average Score on a scale of 0-5, 0 being "Never again. Need to set my mouth on fire to extinguish the memory" and 5 being "Woohoo! When can I eat that again?" 4
Comments: 
"Good." "Very satisfying!" "Too tasty."

This recipe was featured in a post called Music City in the Midwest for Foodbuzz.com's 24x24 event, for which 24 food bloggers from around the world are selected to host dinner parties within the same 24 hours and blog about them.

Thanks for Reading! Here's to Being the Secret Ingredient in your life.

Tuesday, March 6, 2012

Homemade MoonPies

The Setting: Pretty day, too much of it spent indoors.

The Soundtrack: Wheel of Fortune.

Steaming up the (microwave) Oven: Leftover pinto beans and brown rice.

The Scenario: Take-Home Treat number one from Music City in the Midwest: Homemade MoonPies.

MoonPies may not come from Nashville, but they do come from Tennessee, and they're beloved all over the South as part of the much-sung-about dynamic duo, the RC Cola and the MoonPie, aka "the working man's lunch."

Born in Chattanooga in 1917, the marshmallow-filled, chocolate-coated sandwich cookie was inspired by coal miners who wanted a substantial snack to get them through their long, lunchless workdays.

When a bakery salesman asked the miners how big they'd like the treat to be, "a miner held out his hands, framing the moon, and said, 'About this big!'" (http://moonpie.com/about)

In the 70s Mardi Gras paraders along the South's Gulf Coast started throwing MoonPies instead of Cracker Jack boxes from their floats, as the MoonPies were a little softer and less likely to take an eye out. This tradition continues today.

If you're a fan of the MoonPie, it would certainly be easier to buy a case of the real deals from a warehouse store (or attend a Mardi Gras parade) than to proceed with the following recipe, but if you're a MoonPie lover with a penchant for taking on big weekend projects, then this recipe is for you!


Homemade MoonPies
The cookies may seem a little crisp at first, but they should soften just enough when put together with the marshmallow cream and chocolate. The Marshmallow Cream is a tweaked version of the Homemade Marshmallows from Rebecca Rather's Hot Chocolate Layer Cake with Homemade Marshmallows, as seen in this post. This recipe makes enough Marshmallow Cream for two batches of Golden Cookies. One batch of cookies makes approximately 32 cookies, or 16 MoonPies.

~For the Golden Cookies~
3 cups all-purpose flour
1 tsp kosher salt
3/4 tsp baking powder
1/4 baking soda
2 sticks butter, softened at room temperature
2/3 cup sugar
1/4 cup honey
1 egg yolk
1/4 tsp pure vanilla extract

~For the Marshmallow Cream~
1/3 cup powdered sugar, for rolling
1 1/2 cups cold water, divided
3 (1/4-oz) envelopes unflavored gelatin
2 cups sugar
1 cup light corn syrup
1/4 cup sweetened condensed milk
1/4 tsp kosher salt
1 tsp pure vanilla extract

~For the Chocolate Coating~
If making two batches of cookies, double the following, but do not melt all at once. Follow the instructions in the recipe below, and make the second batch of chocolate coating when you run out of the first.
10 oz semisweet and/or dark chocolate, divided
10 oz milk chocolate, divided
3 1/2 T coconut oil, divided


Make the Golden Cookies: Preheat oven to 350 degrees F and line two baking sheets with parchment paper.

In a small bowl whisk together the flour, salt, baking powder, and baking soda. Set aside.

In the bowl of an electric mixer beat together the butter, sugar, and honey till light and fluffy. Beat in the egg and the vanilla till thoroughly incorporated. Add the dry ingredients, mixing on low until dough comes together.

Turn the dough out onto a large sheet of parchment paper, pat into a rough rectangle, and divide in half. Working with one half at a time, top with another sheet of parchment, and use a rolling pin to roll the dough out to a thickness of 1/8-to-1/4 inch.

Use a 3-inch round cookie-cutter to cut out as many circles as you can, and gently transfer them to the prepared baking sheet. Re-roll remaining dough, and repeat until you have gotten as many circles out of the dough as you can.

Bake the cookies, one sheet at a time, on the center rack of the oven, at 350 degrees F for 13 minutes or till light golden and cooked through with as little browning around the edges as possible. Let cool 5 minutes on the baking sheet before transferring to a cooling rack to cool completely.


Before making marshmallow cream, arrange cookies in 4 rows on sheets of parchment paper so that the first and third rows are bottom side up, and the second and forth rows are bottom side down.

Make the Marshmallow Cream: Prop up each of two disposable pastry bags in each of two tall drinking glasses and fold the tops of the bags down a few inches (as if you were going to turn then inside-out). Set aside.

Sift the powdered sugar into a wide, shallow dish. Set aside.

Sprinkle the gelatin over 3/4 cup cold water in the bowl of an electric stand mixer fitted with the whisk attachment.

Fix a 3-quart saucepan with a candy thermometer so that the bottom of the thermometer is just above, not touching the bottom of the pan. Make sure the thermometer is set to Fahrenheit. Add the sugar, corn syrup, sweetened condensed milk, salt, and remaining water to the pan and bring to a boil over medium heat. Do not stir. Continue cooking until the thermometer reads 231 degrees F. The mixture will be light-golden-to-pale-amber in color. Remove from heat, turn the mixer on low, and very slowly and carefully stream the sugar mixture into the gelatin mixture.

Add the vanilla and increase the speed slightly. Continue increasing the speed slightly every 30-to-60 seconds until the speed is set to high. Beat on high until the mixture is white, fluffy, and voluminous and the bowl is almost cool to the touch, about 6 minutes.


Split the mixture between the two pastry bags and immediately begin piping the Marshmallow Cream onto the Golden Cookies with the bottom sides up.


Top each one with another golden cookie, bottom side down, and press gently. Roll the exposed-marshmallow edges of the sandwiched cookies in the powdered sugar. Cover with plastic wrap and allow to set for at least 1 hour or up to 1 day.


Line your countertop with parchment paper.

Prepare the Chocolate Coating: Place 6 oz semisweet chocolate, 6 oz milk chocolate, and 2 T coconut oil in a medium-sized, microwave-safe bowl. Microwave for 30-second intervals, stirring thoroughly after each, until the chocolate is almost completely melted. Stir till completely melted and smooth.

Press each cookie sandwich into the chocolate so that the chocolate coats the bottom and sides. Gently grasping the top cookie, allow the bottom cookie to gently graze the side of the bowl to remove excess chocolate as you transfer the cookie sandwich to the parchment paper to set.


Once the chocolate has set, place a cooling rack over a jellyroll pan or rimmed baking sheet lined with parchment paper. Space the cookie sandwiches 1-2 inches apart, chocolate sides down, on the cooling rack, and prepare remaining chocolate as before.

Spoon chocolate over the cookies, using the spoon to smooth the chocolate out over the sides, covering any exposed cookie or marshmallow. Allow to set completely.


Cooled excess chocolate can be removed from parchment, added back to the bowl, and reheated if necessary, or peeled off parchment and transferred to a plastic bag for future use or snacking.

MoonPies can be stored, covered, at room temperature for up to one week.


Guest Feedback:
Average Score on a scale of 0-5, 0 being "Never again. Need to set my mouth on fire to extinguish the memory" and 5 being "Woohoo! When can I eat that again?" 4.4
Comments:
"OMG--So good!" "Like my childhood!" "Best MoonPie I've had." "Yummo."

This recipe was featured in a post called Music City in the Midwest for Foodbuzz.com's 24x24 event, for which 24 food bloggers from around the world are selected to host dinner parties within the same 24 hours and blog about them.

Thanks for Reading! Here's to Being the Secret Ingredient in your life.

Thursday, February 9, 2012

Fantasy S'mores


The Setting: An unusually gorgeous day in South Bend, but still too cold to do much playing outdoors.

The Soundtrack: Dripping water--no clue as to its source.

Steaming up the oven: Sweet potatoes for Oia. We're gonna give solid foods a go.

The Scenario: Call it trite, but I am obsessed with S'mores. I am also highly fond of the whole bacon-and-chocolate, savory-sweet thing--I know, I know, it's so overplayed it's been on the menu at Denny's. But that doesn't make it any less delicious, now does it?

For a while now I've been dreaming about what happens when these two worlds collide in an all-natural, made-from-scratch kind of way. It's time to make dreams come true.

Let's meet the players.


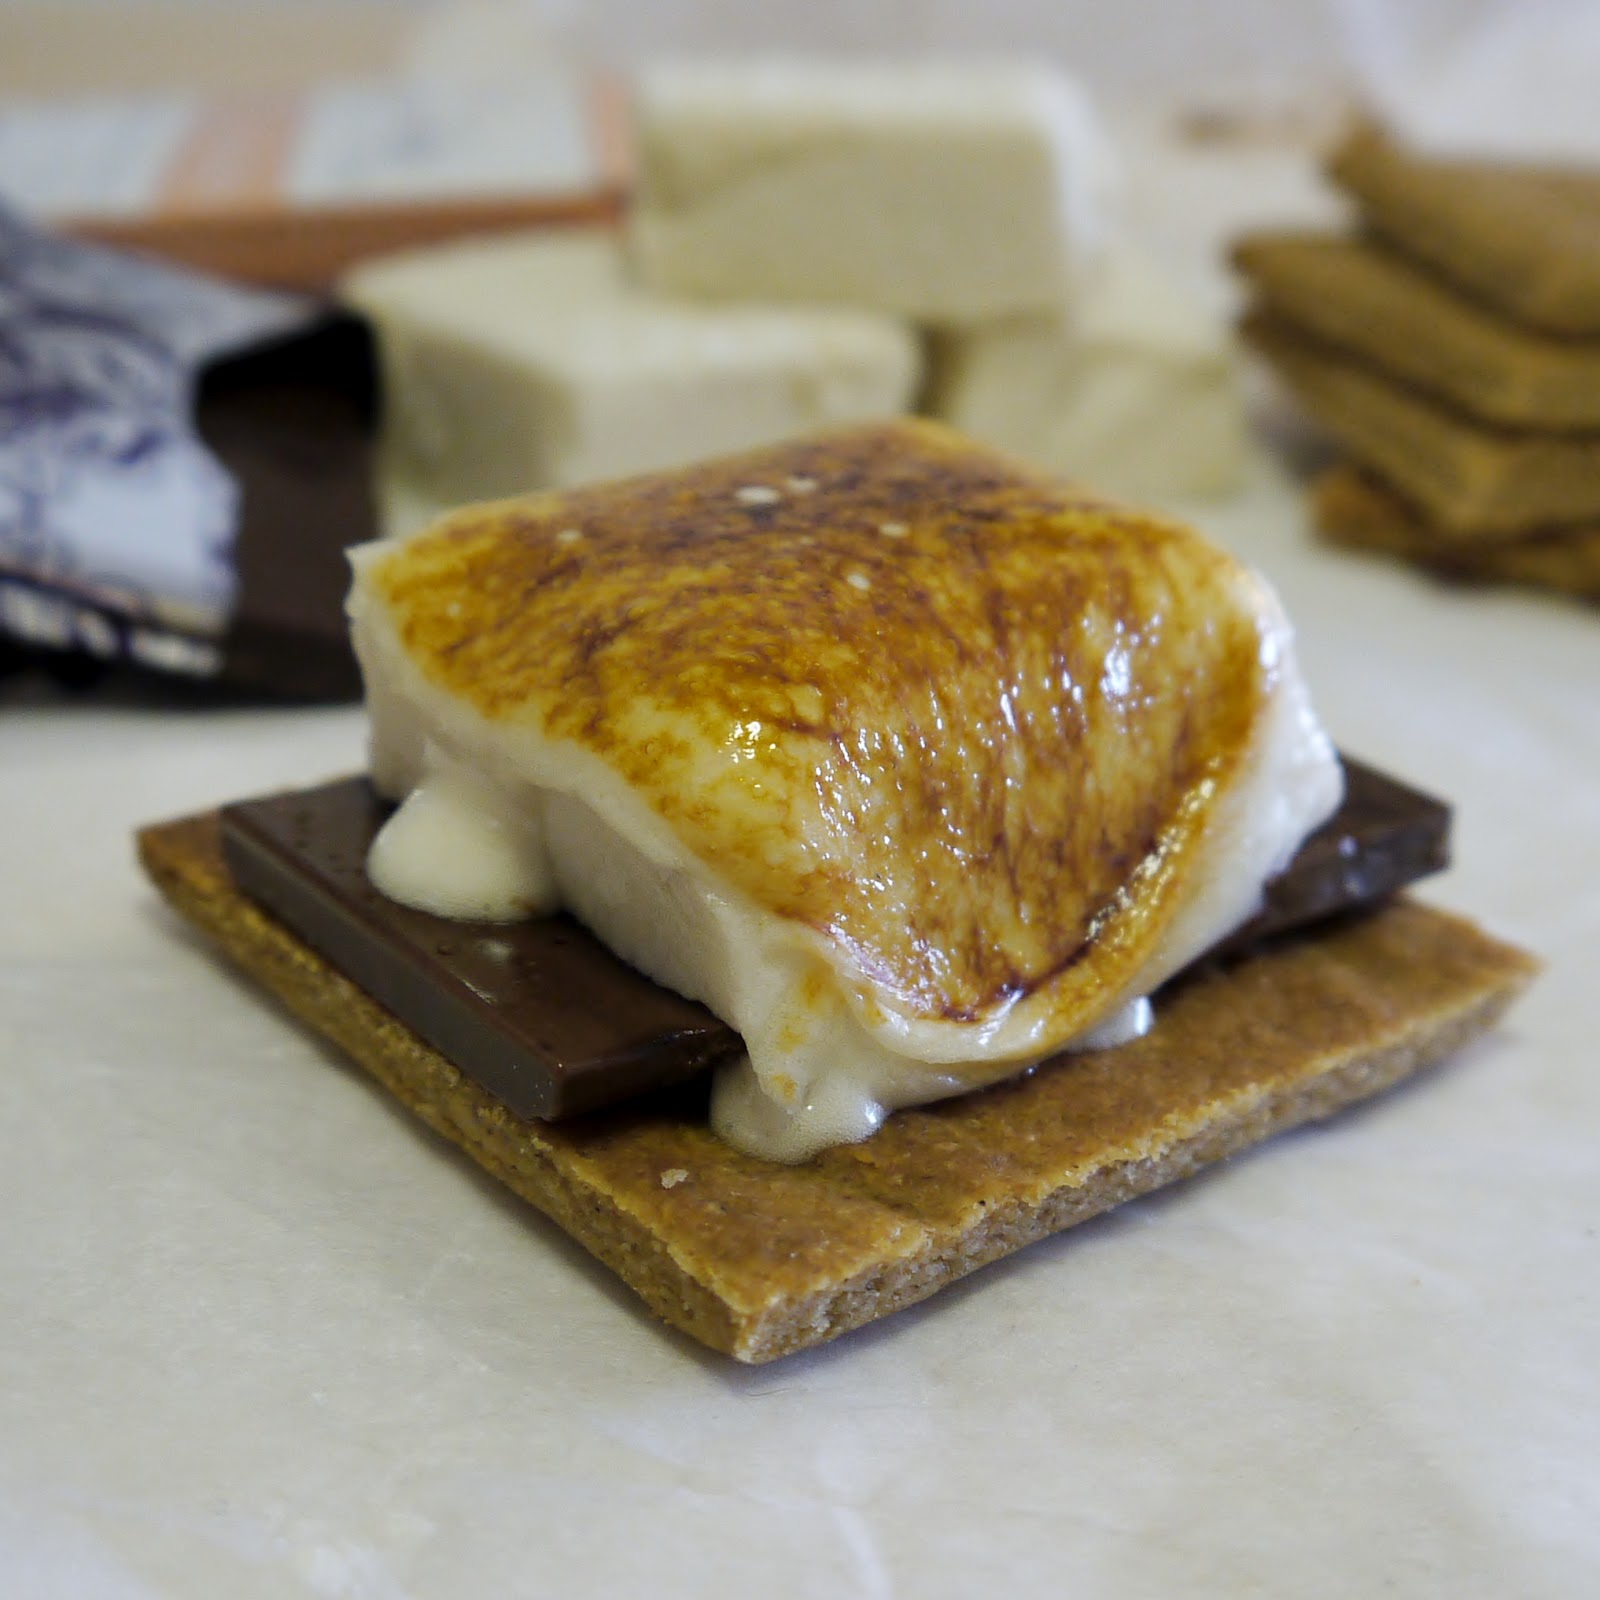
The Grahams: Homemade Honey-Butter Graham Crackers. You know how graham crackers are usually lower in fat and better for you? Well, these are pretty fattening. Sorry. However, they do contain mostly whole wheat four, so they have that going for them...which is nice.

The Chocolate: Vosges Mo's Milk Bar--a splurge to be sure, but so, so good. This milk-chocolate-bacon bar was the inspiration for the fantasy in Fantasy S'mores. I used to buy the pork-spiked chocolate on my lunch breaks when I was coping with work stress and pregnancy cravings and imagine it melting between layers of hot, toasted marshmallows and crispy, golden grahams. If you can't find (or don't want to buy) this chocolate, here's what you do: Dice up a slice of bacon, fry it till it's nice and crisp, let the fat drain off on a paper towel, and distribute the bacon in an even layer in a parchment-paper-lined loaf pan. Melt 2-4oz of milk chocolate and pour over the bacon. Sprinkle sparingly with finishing salt (if you desire) and let set. Now you have a hand-crafted milk-chocolate bacon bar.


The Marshmallows: Homemade Maple-Brown-Sugar Marshmallows. Follow this recipe, but swap out 1/4-cup each of the corn syrup and white sugar for 1/4-cup each of pure maple syrup and brown sugar, respectively. I was a bit conservative with this swap. Next time I'll do all brown sugar and 1/2-cup each of corn syrup and maple...or see if I can get my hands on some pure maple extract. Cut the marshmallows into 2-inch squares, or the size you desire.

Marshmallow Making

The Execution: You surely know how this goes campfire-side, but (thanks to my awesome stepsister Becky who read this post and decided to give me a creme brulee torch for Christmas) here's the way I do it indoors:

Place one of the grahams on a microwave-safe plate, top with a square or two of chocolate, and microwave for 20-25 seconds to soften the chocolate.

Place a marshmallow on top of the softened chocolate.


Use a creme brulee torch to carefully melt/brown the top and sides of the marshmallow.

Press a second graham on top of the marshmallow, allowing the melted goo to squish out just a bit on the sides.


Enjoy--with or without your favorite scary stories or campfire songs.

Thanks for reading! Here's to Being the Secret Ingredient in your life.

Tuesday, January 3, 2012

Hats off to Rebecca Rather

Photo by Sebastien Papin

The Setting: Christmas Day in Brentwood, TN.

The Soundtrack: Miscellaneous Christmas tunes on my mother's iPod.

On the Stove-top and Steaming up the Oven: A Christmas feast for 15.

The Scenario: It really is the world's greatest chocolate cake.


If you read my last post and/or the forth post I ever posted (circa this time two years ago), then you know this cake has been a while in the making.

The towering, mouthwatering, focal point of the most beautiful magazine cover I've ever seen (Fine Cooking Dec '09/Jan '10) captured my attention and trampled on my ambition Christmas 2009.

Christmas 2010 saw me curled up a la fetal position on the loveseat in our Florida apartment, cursing food and praying to keep down the saltines and chocolate ice cream that composed my morning sickness diet.

This year I was back in the action, back in Nashville, back behind the apron.

The menu featured Spiced Cider, Mini Cranberry-Rosemary-Pecan Corn Muffins, Goat-Cheese-Stuffed Roasted Tomatoes and Baby Portabellas, Sauteed Kale, Garlic-and-Rosemary-Roasted Sweet Potatoes, and ridiculously rich yet teasingly light and fluffy Twice-Baked Gorgonzola Souffles.

It was an exceptional meal.

But the clear headliner of this all-star cast was without a doubt, the comeback king of 2011, the Hot Chocolate Layer Cake.

Photo by Sebastien Papin

This year I made certain I used 3 9-inch cake pans with straight--not sloping--sides.

I buttered, parchment-lined, and floured them.

I used fine Callebaut chocolate in the icing and batter.

I crumb-coated and refrigerated. I periodically dipped my offset spatula in a glass of hot water while applying the final coat to give the icing its (near) flawless sheen.

Most importantly, I gave myself several days from boiling the sugar to cutting the marshmallows and giving them their final dusting of cocoa atop the cake to  asure it all came together this time.

And perhaps it was a Christmas miracle, but it did.

Fudgy, dense, everything you always wish the chocolate cake you waste your calories on would be.

You can find Rebecca Rather's incredible recipe online in the recipe archives of  Fine Cooking.

Photo by Sebastien Papin

Happy holidays!


Monday, January 2, 2012

If at First You don't Succeed...


The Setting: My mom's exquisite kitchen. I'm so jealous.

The Soundtrack: Harry Connick, Jr. When my Heart Finds Christmas.

On the Stove-top: A mixture of corn syrup, water, and sugar, destined to become homemade marshmallows.

The Scenario: It's days before Christmas, and this year the cake will be perfect.

It's my first time making homemade marshmallows. It's been on the to-do list for a while now, but today the stars will align, the sugar will boil, and the gelatin will set. It's going to happen.

I find the right-sized saucepan, fit it with a candy thermometer, and watch closely for the magic moment when the screen reads 234 degrees.

It's taking longer than expected.

I step waveringly over to the sink, where I figure I can be productive with my waiting time, doing dishes while keeping an eye on the thermometer.

It sure is taking a while....

Suddenly, I feel compelled to rush to the stove. As I peer into the saucepan, my face is smacked with smoke, and my eyes meet a molten, black, cavernous wasteland of what used to be sugar, now shellacked to the stainless steel in a way that says my mom will now have one more miscellaneous saucepan lid hanging out in the cupboard.


Is my thermometer broken? Is there a typo in the recipe? The temperature isn't even close to 234!

I pick up my dud of a thermometer, thinking that's what I get for buying the cheaper one, when I see a little C on the screen, sticking out its tongue and making an L over its forehead at me.

That's right, it is set to Celsius.

Good show, old gal.

Now some days this giant, rusty nail in my foot might cause me to sit one out.

But these marshmallows are for my Christmas cake, and not just any Christmas cake, but the second attempt at the near-epic-failure Hot Chocolate Layer Cake of 2009 that inspired one of my very first posts.

That cake, while delicious by the grace of God, was a dilapidated, marshmallow-less, structural nightmare.

And while this year's cake will have every opportunity to cave in and/or crumble, it certainly will have marshmallows.

I take the thermometer and fiddle with the buttons till the C is replaced with an F and attach it to a clean saucepan.

Holding my breath, I place the pan over a med-high flame, glance at its snow-white contents, and recall wistfully the crystallized-tar situation I just had on my hands. Please, Lord, don't let this lovely, innocent sugar meet the same fate.

I watch the mixture closely as ten minutes pass...and...at last! 234!

It looks perfect.

I turn on my mom's electric mixer and slowly stream the glossy syrup into the gelatin that's been blooming and waiting like a woman for her wedding day, and I beat the mixture till it's voluminous, white, and fluffy (like her dress).

I pour the mixture into a parchment-lined and powdered-sugar-dusted sheet pan, dust a little more sugar over the top, cover, and call it day.

It's gonna be a good Christmas.

Vote for Being the Secret Ingredient to be one of Babble.com's Top 100 Mom Blogs!