Showing posts with label fruit desserts. Show all posts

Friday, August 23, 2013

Goat-Cheese-Stuffed Cherries


As I mentioned in the last post, I received a pretty stellar assortment of summer fruit tools as part of OXO's Blogger Outreach Program. Now I am not required to blog about all (or any) of the tools I receive, but when something makes my life easier and more fruitful (bad pun intended), I want to share.

Last time, I sang the praises of OXO's large fruit scoop, mango splitter, and pineapple slicer, but there was one more tool I simply had to get my hands on before we said adieu to summer: the cherry pitter.

I am a huge fan of fresh cherries, but eating them around my two-year-old can be a bit of a pain. She always wants what Mommy is eating, and giving her a big bowl of cherries with the pits intact is as good as scheduling myself a Heimlich-maneuver practice session. In the past I'd bite around the pit and hand her bits of the flesh as I'd go, or I'd forget about buying cherries in the first place.

Fortunately for me, the cherry pitter has changed all that. Now Oia and I can share a bowl of cherries, our fingers taking on deep shades of crimson, as we watch Dora the Explorer and prepare to take on the world.

This recipe is inspired by my love of the union of dark chocolate, cherries, and goat cheese, and by the easy-to-use OXO cherry pitter. I mean, after you put holes in a whole mess of cherries, it's only right to fill them with something yummy, don't you think?

This recipe can be made in whatever quantity desired, exact measurements not necessary.

The mascarpone adds creaminess, smooths out the texture of the filling, and slightly softens the flavor of the goat cheese. Though often compared to cream cheese, mascarpone tends to have a creamier mouthfeel, and a subtler (less tart) flavor, and a slight, inherent sweetness not found in commercial cream cheese. You could substitute cream cheese for the mascarpone if necessary, but you would probably want to add a little sugar to cut the tartness.


Goat-Cheese-Stuffed Cherries
Fresh, sweet cherries (such as Bing)
Equal parts fresh goat cheese (chevre) and mascarpone cheese, both at room temperature
Very dark chocolate (I used Endangered Species 88% cocoa), for finely chopping or grating

Wash the cherries and pat dry before pitting. Pit the cherries with the stem-sides up.


Beat together the cheeses until smooth and fluffy--the mixture will be somewhat firm but airier and very well combined.


Transfer the cheese mixture into a small piping bag, snip off a small opening at the end, and pipe a small amount of the mixture into the bottom of each cherry. The cherries will sit upside down (stem-side down), with the puffs of filling peeking out from the bottoms (now the tops).


Sprinkle the chocolate over the tops of the stuffed cherries and transfer to a platter to serve or to an airtight container to chill until ready to serve.


The stuffed cherries make an excellent sweet hors d'oeuvre for a cocktail party or a perfect tiny bite to serve with coffee at the end of a large meal. Minus the chocolate, they were also a pretty major hit with my two-year-old, who now can't stop asking for more stuffed cherries--yea! They'll keep well, stored in an airtight container in the fridge for up to 5 days.


Thanks for reading! Here's to Being the Secret Ingredient in your life.

Saturday, April 20, 2013

Strawberry-Colada Pavlovas


The Setting: A quiet and peaceful evening at the Crumm house--the little one has been sleeping for almost two hours!

The Soundtrack: Duck Dynasty. Gotta love it.

On the Stovetop: Nothing now, but Hoosband made some killer chicken quesadillas for dinner.

The Scenario: A dessert inspired by a drink....

Last summer Hoosband and I had a revelation in frozen-drink making: the Strawberry Colada.

Though I've never seen it on a drink menu, I'm quite sure we're not the first to think of it.

While I have no idea what may have qualified as a Strawberry Colada to the barkeeps who blended before us, ours is a simple and relatively healthy concoction of frozen strawberries, coconut milk (the kind that comes in a milk carton) and coconut rum. Three ingredients to pure, island-fantasizing, hammock-by-the-ocean bliss.

Last week, back on the mainland, I had a couple of egg whites hanging around after a pudding-making endeavor, so I froze them to save for another one of Hoosband's favorite indulgences: meringue and berry pavlovas.

I generally keep the pavlovas pretty simple: whipped cream and fresh raspberries in a crunchy-on-the-outside, marshmallowy-on-the-inside meringue shell (as in Raspberry Pavlovas, Jan 2012).

This time I wanted to mix things up a bit.

Since the market had gorgeous, organic strawberries on sale (and because I've been dreaming of the beach), I decided to take some inspiration from our favorite frozen beverage.

The result?

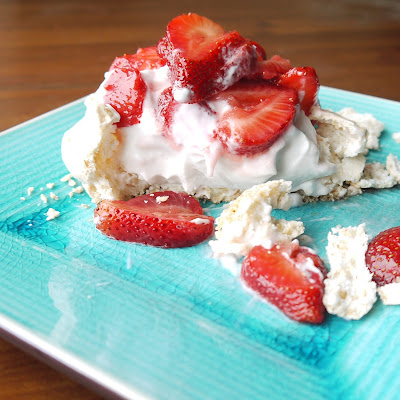
Meringue shells speckled with toasted coconut, loaded with whipped coconut cream and topped with coconut-rum-spiked strawberries.

It's not quite like being on the beach--more like blissfully looking down on the islands from a white, puffy cloud.

It's easy to put your own spin on this dreamy dessert. Here are a few simple variations:

To make it a bit more beachy, add the zest of one lime to the strawberry mixture--I did this before eating my third pavlova, and I think I like it even better this way.

For more of a literal interpretation of the strawberry colada, puree the marinated strawberry mixture into a smooth sauce in the blender.


If you're a "love the taste, not the texture"-fan of coconut, as I used to be, feel free to omit the grated coconut in the meringues.

If you're not a fan of coconut rum or don't have any on hand, try Grand Marnier (orange-flavored brandy liqueur) instead--it's usually my go-to with sliced strawberries, and it's never served me wrong--or omit the booze altogether, no substitutions necessary.


Strawberry-Colada Pavlovas

~for the strawberries~
1 quart fresh strawberries, rinsed and patted dry
2 T granulated sugar
2 T coconut rum (such as Malibu)

Use a paring knife to hull the berries (remove the leafy, green stem-area) and slice them thinly.


It doesn't really matter which way you slice them, but I prefer to do it along their length.

Place the strawberries in a refrigerator-safe container that can be sealed and add the sugar and rum, stirring to coat evenly.


Store the strawberry mixture in the fridge until for at least 8 hours or until ready to use (up to three days). The berries will become softer and syrupy.


~for the meringue shells~
1/4 cup unsweetened, grated coconut
2 egg whites, room temperature (if you start with frozen egg whites, thaw them overnight in the fridge)
1/8 tsp cream of tartar
1 tsp pure vanilla extract
1 tsp coconut rum, optional
3/4 cup granulated sugar

Place the coconut in a dry skillet over medium heat and toast, stirring frequently, until light golden.


Remove from heat and set aside to cool.

Preheat the oven to 300 degrees Fahrenheit (if your oven tends to run hot, decrease the temp slightly). Line a baking sheet with parchment paper or a silicone mat--if desired, you can trace six three-inch circles on parchment paper and flip it over so that you have guides for piping your shells. I prefer to go freehand.

Place the eggs whites, cream of tartar, vanilla, and rum in the bowl of an electric mixer and beat on medium speed until the whites are foamy and can hold a soft peak when you lift up the paddle.


With the mixer on med-low speed, slowly add the sugar, one tablespoon at a time, beating just until the mixture is bright white, glossy, and can hold a stiff peak when you lift up the paddle.


Using a rubber spatula, gently fold in the toasted coconut.

Transfer the mixture to a piping bag (working in batches if necessary) and pipe six, three-inch meringue shells onto the prepared pan: Put the tip of your piping bag down where you want the center of the circle to be, and pipe out a tight coil of meringue until it is the desired width. Then lift the tip to make a ring around the edge of the coil, creating a well. Repeat to create six shells.


Bake the meringues at 300 degrees Fahrenheit for 23 minutes or until cream-colored and crisp on the outside. The insides will have a very slight jiggle. Allow to cool five minutes on the baking sheet; then carefully slide the parchment or silicone mat onto a cooling rack and allow the shells to cool completely.


~for the whipped coconut cream~
1 can full-fat coconut milk, room temperature
2 T powdered sugar
1 tsp pure vanilla extract
1 tsp coconut rum

Open the can of coconut milk and use a fork to scoop the fatty top layer of cream into a powerful blender, making sure to keep the thinner, watery liquid in the can (the fork helps any liquid to drain off).


Don't worry if there are a few clumps of cream left in the can.


If desired, transfer the watery liquid to an airtight container and keep in the fridge for smoothie-making or another upcoming purpose. Clumps of cream left in the the can will actually make smoothies even better!

Add the remaining ingredients to the blender and blend on high for about 30 seconds or until the mixture looks like slightly frothy milk. Transfer to a small container and chill for about an hour. It will have thickened slightly. Transfer the cream to a large, metal bowl, and use a wire whisk to whip the mixture by hand until it is able to hold soft peaks.


For a more detailed explanation of this process, see this post.


If not assembling the pavlovas right away, store the coconut cream in an airtight container in the fridge until ready to use (up to 4 days). It will thicken slightly in the fridge but will still be easy to work with.

~to assemble~
Place a meringue shell on a dessert plate and spoon the coconut cream into the center "well" of the shell.


Top with the prepared strawberries and enjoy!


Thanks for reading! Here's to Being the Secret Ingredient in your life.

Monday, May 7, 2012

Deep-Fried Bananas: A Dessert from the Mekong


The Setting: An apartment in need of a good cleaning, a bit of last-minute packing, and some mouths to help eat all the ice-cream that remains in our freezer!

The Soundtrack: The Lion King.

Steaming up the Oven: Nothing now, but the promise of chipotle-gazed shrimp is on the horizon.

The Scenario: As Hoosband and I prepare to depart for Dallas and then Fairfax this summer, the journey down the Mekong with Hot Sour Salty Sweet comes to an end, like any good meal, with dessert.

It's been a pretty ridiculous month or two.

Oia turned nine-months old in April (which I'm still trying to wrap my head around), so she is busy discovering her world, increasing her hand-and-knee mph, and becoming increasingly harder to keep up with--I know, it's just the beginning.

Work on the cookbook has been keeping Hoosband and I well-padded, well beyond winter.

Preparing for three moves (and many long car rides) this summer has had us packing, cleaning, organizing, and agonizing.

And Hot Sour Salty Sweet has been indulging our adventurous sides in the kitchen and on the blog.

Like any worthy adventure, the journey down the Mekong with Alford and Duguid has had its ups and its downs: Vietnamese Chicken Salad will be a new staple in our household; homemade rice noodles will not.

However, the very best adventures always end on a high note, or at least a redemptive one, and I'm pleased to report the conclusion to our culinary journey through Southeast Asia is both.


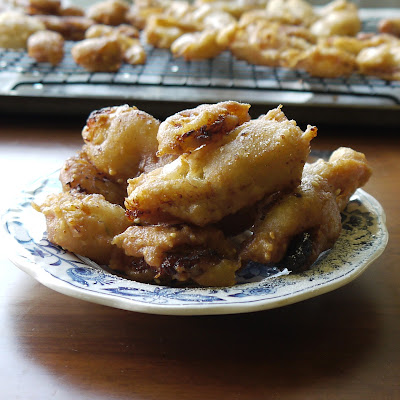
Not only did I manage to actually track down every ingredient in the recipe and successfully execute the instructions--yes mom (and Hoosband, and teachers throughout the years), it's possible--but the resulting crispy puffs of deep-fried deliciousness were, well, delicious.

I am a lifelong connoisseur of both bananas and all-things fried, but these Thai treasures were surprisingly scrumptious, even to me. I think it's the roasted sesame seeds in the batter that send this dessert from "hey, not bad" to "betcha can't eat just three."

Try the recipe for yourself and let me know what you think--I'd love your feedback.

And if you like what you've seen here, remember to check out Hot Sour Salty Sweet for more of Alford and Duguid's mouthwatering memories from the Mekong.

I know I'll be planning my return trip soon!

The following recipes are reprinted with permission from Artisan Books; my notes are in red.


Fried Bananas (gluay khaek--Thailand)
1/3 cup all-purpose flour
1/2 cup rice flour, or more if needed
1/2 tsp baking powder
2 T sugar
1/2 tsp salt
1/2 cup water or canned or fresh coconut milk I used the kind in the carton from Silk.
1 T Dry-Roasted Sesame Seeds (page 308 see below) (optional)
4 to 5 firm ripe bananas I had just enough batter for 4 large bananas
Peanut oil for deep-frying

In a large bowl, mix together the flours, baking powder, sugar, and salt. Add the water or coconut milk little by little, stirring until a smooth batter forms. The batter should be a smooth paste, not watery; add a little extra rice flour if it seems thin. Stir in the sesame seeds, if using. Let stand for 10 minutes.


Peel the bananas. Cut crosswise in half, then slice each lengthwise into 3 slices.


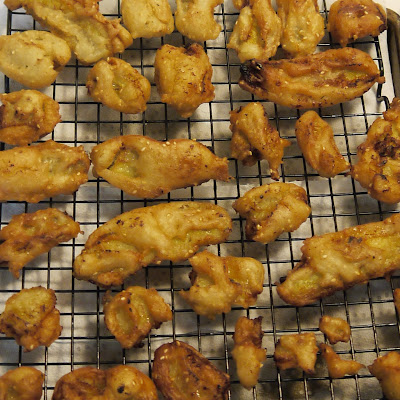
Place a heavy pot or stable large wok over high heat. Add oil to a depth of about 1 1/2 inches (in the deepest part of the wok) and heat until the oil just starts to smoke. I personally do not recommend letting the oil smoke, but it should start to sort of shimmer and almost ripple. To test for temperature, add a blob of batter to the oil: It should sink and then rise back up immediately, without turning black. If it blackens quickly, the oil is too hot and you should reduce the heat to medium-high. If it doesn't rise back up to the surface, the oil is not yet hot enough; wait another minute or two before testing again. Place a paper towel-lined plate by your cooking surface. I like to place a cooling rack on top of a paper towel-lined baking sheet.

When the oil is at the right temperature, place a banana piece in the batter and turn to coat it, then slip it in the hot oil. Repeat with a second piece of banana. If the banana is very ripe and a little soft, the pieces may break up into two smaller pieces; don't worry, it doesn't matter. Most of mine broke; they were no less delicious. Deep-fry, turning them over halfway through cooking, until golden brown, 1 to 2 minutes, depending on the size of your pot. Remove with a slotted spoon, pausing to allow excess oil to drain off, and place on the paper towel-lined plate. Repeat with the remaining bananas. Transfer the cooked bananas to a plate and cover or place in a 150 degree F oven to keep warm. Serve hot. I couldn't resist sifting a little powdered sugar over the tops of the fried bananas, not that it is at all necessary. Also, while they are best served hot, I found them equally as addictive at room temperature and even straight out of the fridge the next morning with a hot cup of coffee.

Makes 24 to 30 pieces; serves 4 to 8, depending on the size of your bananas.

Note: Vietnamese restaurants often serve a colonial fusion version of this, called bananes flambees. Long slices of banana are pressed flat, dipped in batter, and fried. Just before they go to the table, they're dusted with sugar and then a liqueur or high-alcohol rum is poured over and set alight. The bananas arrive glowing with quiet blue flames.

Excerpted from Hot Sour Salty Sweet by Jeffrey Alford & Naomi Duguid (Artisan Books). Copyright 2000.

Dry-Roasted Sesame Seeds
Like peanuts, these contain a lot of oil, so they can burn very quickly. Place a heavy skillet over medium-high heat and add about 1/2 cup sesame seeds (or whatever quantity you wish to roast). Use a wooden spoon to stir them continuously and keep them from burning. Once they are golden and aromatic, lower the heat slightly and continue to stir and turn until they are a rich golden brown. Transfer to a bowl and stir several times as they cool to help the steam escape. When they are completely cool and dry, store in a sealed glass container in a cool place.

If you want to crush or grind roasted sesame seeds, use a spice grinder or a mortar and pestle. The Japanese mortar known as a suribachi has ridges inside its bowl, ideal for grinding sesame seeds.

Excerpted from Hot Sour Salty Sweet by Jeffrey Alford & Naomi Duguid (Artisan Books). Copyright 2000.


Thanks for reading! Here's to Being the Secret Ingredient in your life.

Friday, April 6, 2012

You Little Tart!

The Setting: Beautiful blue skies!

The Soundtrack: GCB on Hulu.

Steaming up the oven: Nada...but I'm contemplating pizza.

The Scenario: Testing recipes for a cooking class I'm teaching on the 22nd (Earth Day).

Since it's finally spring, and the markets are beginning to come alive with the vibrant colors and welcome flavors of juicy berries and fresh asparagus, I figured...

What better way to celebrate spring than to proudly flaunt its bounty atop French tarts?

For something savory, Asparagus, Leek, and Goat Cheese Tarts.

And for something sweet, berry tarts--but not just any berry tarts--Vegan Berry Tarts!

My test run for the asparagus tarts went off without a hitch, but the vegan tarts presented a couple of hiccups.

My first fling with the butterless tart shells resulted in cookie-shaped mini-scones with a flavor and mouthfeel somewhere between super-crumbly shortbread and flaky croissants--pleasant enough, but not what I was going for.

A reduction in the amount of coconut oil and the addition of just a touch of tofu yielded an easy-to-work-with dough and perfect vegan tart shells.

As for the filling, the combination of orange marmalade, vanilla bean, powdered sugar, and tofu, when blended to oblivion, provided a surprisingly dead-on substitution for traditional pastry cream.

I'm shocked, and pleased, to say I could just about replace the real pastry cream and tart shells in my repertoire with the simpler and more healthful vegan versions from here on out.


Vegan Berry Tarts
The crust and filling for these tarts share one package of tofu. For the crust, do your best to measure level tablespoons of the coconut oil and tofu. Using measuring spoons instead of measuring cups keeps the oil and tofu in small increments that will break up more easily in the food processor without over working the dough or melting the fat.

~for the crust~
8 T coconut oil, room temp
4 T (from a 12.3 oz package) firm tofu (I used Silken)
1 1/3 cup whole wheat pastry flour
1/3 cup powdered sugar
1 tsp kosher salt
3 T non-dairy dark chocolate chips

~for the filling~
remainder of the package of tofu
1/4 cup orange marmalade
1/2 cup powdered sugar
1 vanilla bean
assorted berries for topping, cleaned and patted dry if necessary

~for the glaze~
1/2 cup orange marmalade
2 T water

Preheat the oven to 350 degrees F., lay a sheet of parchment paper on your counter, and line two standard size, 12-cup muffin pans with muffin liners.

Measure out the coconut oil and the tofu for the crust, tablespoon by tablespoon, into a cup or small bowl. Place in the freezer just while you prepare the dry ingredients.

Place the pastry flour, 1/3 cup powdered sugar, and salt in a food processor fitted with the dough blade and pulse several times to combine. Remove the coconut oil and tofu from the freezer, use a knife to break up any large clumps, and add to the flour mixture. Pulse until dough comes together in one large ball.

Turn dough out onto the parchment, pat into a flattened disk, wrap up in the parchment, and let rest in fridge for 10 minutes.

Unwrap dough, place another sheet of parchment on top, and roll out to about 1/8 of an inch. Use a jar lid or 3-inch biscuit cutter to cut out 24 circles, re-rolling as necessary. Carefully fit each circle into a muffin cup, pressing gently to avoid tearing or excess stretching. Prick the bottoms of each cup all over with a fork, and bake at 350 for 16 minutes, rotating pans halfway through. Cool completely. Remove tart shells from muffin liners.

Place the dark chocolate in a microwave-safe bowl, and heat for 30 seconds. Stir until smooth. Use a pastry brush to paint a thin layer of chocolate in the bottom of each tart shell. Let set completely at room temperature.

Place the remaining tofu, 1/4 cup marmalade, and 1/2 cup powdered sugar in a blender or in a small-basined food processor fitted with the metal blade. Split the vanilla bean, scrape out the seeds, and add them to the filling ingredients (the pod can be stashed in a bag of sugar or added to a bottle of vanilla extract to boost its flavor). Blend or process till completely smooth and creamy.

Fill each tart shell with the pastry cream and arrange berries on top as desired. Place tarts in a baking pan or wide plastic container, and let chill in the fridge while you prepare the glaze.

Whisk together 1/2 cup marmalade and 2 T water in small saucepan over medium heat. Bring to a gentle boil, reduce heat to low, and cook 2 more minutes. Strain if desired. Cool 5 minutes.

Use a clean pastry brush to gently paint the tops of the tarts with glaze. Refrigerate tarts 20 minutes or until ready to serve. Tarts will keep in the fridge for up to 3 days.


Thanks for reading! Here's to Being the Secret Ingredient in your life.

Saturday, February 11, 2012

Bing Cherry Buckle


The Setting: A February Saturday night.

The Soundtrack: The Outlaw Josey Wales.

Steaming up the Oven: Bing Cherry Buckle.

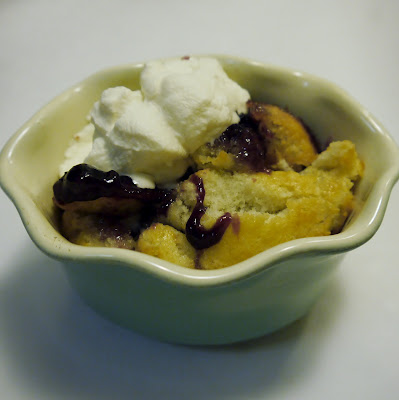
The Scenario: Sometimes a cold winter night demands something sweet, warm, and comforting. Tonight I'm lucky to have three such things: Oia, Hoosband, and one of the easiest desserts you'll ever make.

I've written before about buckles (Peach Cobbuckle, Aug. 16, 2011), and if you happened to read that post before today, I sincerely apologize, as I just discovered a major omission (cake should contain some sugar, don't you think?). It's all fixed now though, so please pursue that recipe (and this one) with confidence.

One of my all-time favorite desserts, buckles are what I grew up calling cobblers and what some people call dump cakes (although that name tends to refer more specifically to the ones made with cake mix and canned fruit because all the ingredients are literally dumped right into the pan), but the main thing you'll be calling it is good.

The purple-red cherries make this a beautiful dessert to conclude a Valentine's Day dinner, and the ease with which it can be thrown together will leave you plenty of time for primping and perfecting your romantic rendezvous.


Bing Cherry Buckle
1 lb frozen, pitted Bing cherries
1 1/3 cups sugar, divided
dash ground cinnamon
1/4 tsp pure almond extract
1 tsp pure vanilla extract
1/2 tsp plus a pinch kosher salt, divided
1 stick (1/2 cup) unsalted butter
1 cup all-purpose flour
1 1/2 tsp baking powder
1 cup milk (skim is fine)

In a medium-sized bowl toss together frozen cherries, 2/3 cup sugar, cinnamon, both extracts, and a pinch salt. Stir thoroughly to distribute ingredients and wet the sugar as much as possible. Cover with plastic wrap and let thaw at room temperature for about 30 minutes (the cherries will still be mostly frozen).

Preheat oven to 350 degrees Fahrenheit. Place butter in a 9"x13" baking pan and set the pan in the oven until the butter is melted (about 5 minutes).

In another bowl whisk together flour, baking powder, 1/2 tsp salt and remaining 2/3 cup sugar. Add milk, stirring just enough to wet all the dry ingredients.

Pour flour mixture over melted butter without mixing. Give cherry mixture a final stir and distribute evenly over flour mixture without mixing (the batter will rise up to the top as it bakes). Bake at 350 for 40 minutes or till light golden, bubbly, and not too jiggly in the center (will take a little longer in a glass or Pyrex pan than in a metal pan). Serve immediately with Chantilly Cream or your favorite vanilla ice cream.


Thanks for reading! Here's to Being the Secret Ingredient in your life.

Tuesday, January 31, 2012

Raspberry Pavlovas


The Setting: Melting snow, vanishing clouds, messy apartment.

The Soundtrack: Gilmore Girls, Season 4

Steaming up the Oven: Meringue Pavlovas

The Scenario: Working on some Valentine's Day ideas....

If you haven't noticed, I have a bit of a thing for meringues (Peppermint Bark Meringues, Meringue Ghosts).

For Valentine's Day I thought I'd up the romantic ante and turn my classic meringues into Raspberry Pavlovas, or individual meringue wells filled with Chantilly cream and topped with fresh raspberries.

Easy on the eyes and almost as easy to throw together, this impressive looking dessert is perfect for a Valentine's Day dinner party or an intimate dinner for two.


Raspberry Pavlovas
2 egg whites
1/8 tsp cream of tartar
1 tsp pure vanilla extract
3/4 cup sugar
Chantilly cream, recipe follows
2 cups fresh raspberries (Do not rinse the raspberries, as they will become waterlogged. Instead, gently pat them with a damp paper towel.)

Preheat the oven to 300 degrees F. Line a baking sheet with parchment paper. If you desire, you can use a 3-inch biscuit cutter or coffee cup to trace circles on the back side of the parchment paper to give yourself a guide for piping. I like to wing it.

Beat the egg whites, cream of tartar, and vanilla with an electric mixer just until stiff peaks start to form. With mixer on, beat in sugar 1 T at a time, allowing each addition to become incorporated.


Gently transfer the mixture to a piping bag and pipe five 3-inch circles of meringue on the parchment. Fill in the circles, and make two more unfilled circles on top of each to create wells.


Bake at 300 degrees F for 25 minutes or until cream-colored, crispy on the edges, and just set in the centers. Since meringues are very delicate and oven temperatures vary, peek at these after 15 minutes. If they appear to be taking on too much color, reduce the oven temp slightly.


Cool to room temperature before very gently removing from the parchment paper. Handle with care.


To serve, fill each well with Chantilly cream and fresh raspberries.


Chantilly Cream
Chantilly cream is a fancy name for sweetened whipped cream flavored with vanilla. This one is sweetened very lightly because the meringues are so sweet already.

1 cup heavy whipping cream
2 T powdered sugar
1 tsp pure vanilla extract

Combine all ingredients in an electric mixer on med-low speed. Beat for 2 minutes. Gradually increase speed to med-high and beat just till the cream holds stiff peaks. Store leftover Chantilly Cream in an airtight container in the fridge for up to one week.


Extra meringues can be carefully placed in a flat, single layer in a zip-top plastic bag and stored at room temperature for up to 3 days. 


The perfect bite will have a bit of everything: chewy, marshmallowy meringue, light and fluffy Chantilly Cream, and the sweet-tart burst of raspberry, flecked with crunchy bits of meringue crust. In the mood yet? 


Thanks for reading! Here's to Being the Secret Ingredient in your life!