Showing posts with label cookies. Show all posts
Friday, October 17, 2014
Chocolate Saucepan Cookies
I love chocolate in just about any form or fashion--except chalky-dry chocolate cakes or other treats that seem to be chocolate in name only. I pretty much want to be hit over the head with chocolate flavor.
That, my friends, is what these cookies deliver.
Made with almond meal instead of flour, they are effortlessly gluten free and have a delightfully mealy texture almost reminiscent of moist, cakey cornbread.
About as easy to throw together as cookies from a mix, Saucepan Cookies are so called because the ingredients are all mixed up in the saucepan used to melt the chocolate, butter, and sugar.
For the best and deepest chocolate flavor, use a chocolate with a cacao content of at least 60%. Flavored chocolates can add subtle interest as well. I particularly love these cookies made with 1.5 oz Green and Black's Organic Ginger Dark Chocolate and 2.5 oz Green and Black's Organic Maya Gold Dark Chocolate (both 60% cacao). The Maya Gold chocolate is flavored with notes of orange and spices, and the Ginger has flecks of crystallized ginger throughout. I love the combination of chocolate and spices, but plain dark chocolate will work equally well if you want to keep it simple.
Chocolate Saucepan Cookies
4 oz dark chocolate
4 oz salted butter (I prefer Kerrygold)
3 oz sugar
1/4 tsp kosher salt
1 tsp pure vanilla extract
6 oz almond flour (aka almond meal)
2 eggs
Preheat oven to 350 degrees Fahrenheit and line a baking sheet with parchment paper.
Melt the chocolate, butter, and sugar together in a medium-sized saucepan over med-low heat, stirring occasionally. Remove from the heat and thoroughly stir in the salt, vanilla, and almond flour/meal, allowing the mixture to cool a bit. Add the eggs, one at a time, stirring to fully incorporate. Use a small-to-medium-sized cookie scoop to transfer blobs of dough to the parchment, spacing about two inches apart.
Bake the cookies for 9-10 minutes. Allow to cool 1-2 minutes on the baking sheet before transferring the whole sheet of parchment to a cooling rack to cool completely. These cookies are best after resting for at least 30 minutes and are even better the next day. Store in an airtight bag or container at room temperature for up to 5 days.
Thanks for reading! Here's to Being the Secret Ingredient in your life.
Tuesday, February 18, 2014
Cherry-Chocolate Chewies
My love for meringues has been well documented:
Meringue Ghosts
Raspberry Pavlovas
Strawberry Colada Pavlovas
Peppermint Bark Meringues
But why not add one more variation to the list?
With a higher moisture-content, thanks to the bounty of tart, dried cherries running throughout, these two-bite treats have a purely chewy, marshmallow-y texture, without the exterior crunch of my usual meringues.
Even better the day after baking, these little chewies will last up to a week, stored in an airtight container at room temperature.
Cherry-Chocolate Chewies
3/4 cup granulated sugar
1/2 cup dried tart cherries
2 large egg whites
1/8 tsp cream of tartar
1 tsp pure vanilla extract
1/4 cup finely chopped dark chocolate (I used Chocolove Strong Dark 70%)
Line two baking sheets with parchment paper and preheat the oven to 300 degrees Fahrenheit.
Place the sugar and the dried cherries in the bowl of a food processor and pulse for 20-second intervals until the sugar is evenly freckled with flecks of cherries.
Set aside.
Place the egg whites and cream of tartar in the bowl of an electric stand mixer and beat until the egg whites are thick, foamy, and just able to hold a very soft peak.
With the mixer on low, add the sugar mixture one tablespoon at a time. Slowly add the vanilla and the chopped chocolate.
Transfer the mixture to a piping bag, and pipe out small "kisses" onto the prepared baking sheets. The kisses can be fairly close together, as the mixture should not spread much while baking.
Bake one sheet at a time at 300 degrees F. for 20 minutes, giving the sheet a 180-degree rotation halfway through. Allow cookies to cool for at least 5 minutes before using a spatula to transfer to a cooling rack to cool completely.
Store in a zip-top bag or other airtight container at room temperature for up to one week.
Makes about 30 little chewies.
Thanks for reading! Here's to Being the Secret Ingredient in your life.
Wednesday, February 27, 2013
Gluten-Free Double Chip Cookies
The Setting: A toasty apartment in the snow-strewn Midwest.
The Soundtrack: Soft snores from the sweet toddler asleep on my lap.
On the Stovetop: Chicken stock.
The Scenario: Giving gluten the old heave-ho.
Okay, so I'm not actually giving up gluten (at least not at the moment).
I recognize, however, that more and more people these days are finding better health and happier lives avoiding gluten-y grains like wheat, barley, and rye. So I thought I'd do a little experimenting to see how my go-to chocolate-chip cookies would fair from the gluten-free treatment.
I had both brown-rice and tapioca flours in my pantry from previous endeavors, so I threw a little of each into the mix.
The results were suburb. They looked and tasted like...well...chocolate-chip cookies.
If there were any downsides to my recipe's GF makeover, they would be these:
1) For some reason the butter and brown-sugar flavors seemed to be somewhat muted compared to my regular cookies, and I was missing a slight nutty flavor from the flour I typically use. Next time, I think I'd add chopped pecans and toffee bits to amp things up a little in the flavor department.
2) I felt like there was an ever-so-slight chalkiness in my mouth after eating these cookies. Nothing major, just the feeling that I needed to brush my teeth--I get the same sensation after eating an under-ripened banana.
3) The alternative flours tend to be more expensive, so people who do not find their health improved by avoiding gluten might want to stick to wheat flour.
Nevertheless, the cookies were delicious. Hoosband, whose nickname ought to be The Glutenator for his love of all things wheat-related, went back for seconds..and thirds...and fourths.
Gluten-Free Double Chip Cookies
1 stick (8 T or 1/2 cup) unsalted butter, softened at room temperature
1 cup brown sugar
1 tsp pure vanilla extract
1 large egg
1 cup brown-rice flour
3/4 cup tapioca flour (aka tapioca starch)
1/2 tsp fine salt
1/2 tsp baking powder
1/2 tsp baking soda
1/2 cup milk chocolate chips
1/2 cup semisweet chocolate chips
Preheat the oven to 350 degrees F. Line two baking sheets with parchment paper. Make sure your oven racks are in the two center-most slots.
Beat together the butter and brown sugar until the mixture is light and fluffy--this should take about 4 minutes on med-high speed.
Scrape down the bowl, add the egg and vanilla, and beat on medium speed for about 2 minutes or until the mixture is once again light, fluffy, and voluminous.
In a small bowl, whisk together the flours, salt, baking powder, and soda.
Add this mixture to the butter mixture and beat on med-low speed until fully incorporated, about 1 minute. Add the chocolate chips and beat on low just to distribute (alternatively, fold them in by hand with a rubber spatula or wooden spoon).
Use a medium-sized cookie scoop to distribute dough mounds between the two prepared cookie sheets, leaving at least two inches between each mound. If, like me, you (or someone in your house) like(s) to sneak spoonfuls of raw dough, you should end up with just enough dough for two large cookie sheets, or about 24 dough mounds. If there are no dough-devourers to be found, refrigerate any leftover dough and crank out a few more cookies when you have an available (and cooled) cookie sheet.
Bake the cookies at 350 degrees Fahrenheit for 11-12 minutes, rotating the sheets halfway through for even cooking. The cookies will look slightly golden around the edges and very underdone in the middles--don't worry, they will set.
Allow the cookies to cool at least 5 minutes on the baking sheets before transferring to cooling racks to cool completely.
Makes 24-30 cookies.
Thanks for reading! Here's to Being the Secret Ingredient in your life.
Wednesday, February 13, 2013
Chocolate-Covered Strawberry Cream Tart Cookies
The Setting: A lovely Valentine's Eve in chilly Indiana.
The Soundtrack: Gilmore Girls, season 5.
Steaming up the Oven: Bread.
The Scenario: A bite-sized treat to make your V-Day extra sweet.
So I've been fantasizing about these little tarts for a while now.
Initially, they were conceived more as mini-tarts than tart-like cookies. The cream layer was conceived as pastry cream, and the jam layer was supposed to be homemade strawberry jam.
I'm not gonna lie, the original concept still sounds pretty darn good.
But when it came time to finally give these little guys a shot, I couldn't find my pastry cream recipe, and I was was all out of homemade jam. I considered making more jam and going from spotty memory on the pastry cream, but store-bought jam and a no-fool, no-cook cream just sounded, well, easier.
The end result was a more cookie-like creation that could hang out longer at room temperature and be eaten with a few fewer napkins. I'll call that a win.
Chocolate-Covered Strawberry Cream Tart Cookies
These little cookie tarts use the same cream filling as my Homemade Oreos and Homemade Oatmeal Creme Pies. For a different twist, try adding the seeds of a vanilla bean to the filling and substituting orange marmalade for the strawberry jam.
~tart shells~
1 2/3 cups all-purpose flour
7 T powdered sugar
1 tsp fine salt
1 1/2 sticks (12 T) unsalted butter, cut into cm-sized cubes and frozen for at least 5 minutes
2 T heavy cream
2-4 T water, milk, or coconut milk
~fillings~
1 batch Oatmeal Creme Pie cream, shaped into a log with a 1 1/2-to-2-inch diameter
3/4 cup strawberry jam
~topping~
3/4 cup heavy whipping cream
1 T coconut oil
1 T light corn syrup
1 cup semisweet chocolate chips (I used Nestle)
2 T chopped unsweetened chocolate (I used Ghirardelli)
To make the tart shells, process the flour, powdered sugar, and salt together in a food processor. Add the butter pieces and pulse until the mixture is sandy-looking and the largest clumps are roughly pea-sized. Turn the processor on, remove the shoot insert, and gradually pour the cream through the shoot. With the machine still on, gradually add just enough of the remaining liquid to begin to bring the dough together. Turn the dough out onto a piece of very lightly floured parchment paper and press it into a disk. Wrap the disk of dough in the parchment and refrigerate for 20 minutes.
Line three standard-sized muffin tins with paper liners and preheat the oven to 350 degrees Fahrenheit.
Unwrap the dough and sprinkle with a little flour if the dough seems too sticky. Place another sheet of parchment on top, and use a rolling pin to roll the dough out between the two sheets of parchment until it is about 1/8-1/4-inch thick. Use a cookie cutter or drinking glass to cut out 2 1/2-to-3-inch circles.
Press the dough circles firmly into the prepared muffin liners so that the edges come 1/4-to-1/2 inch up the sides, and prick the bottoms all over with a fork.
Bake one pan at a time at 350 for 12-14 minutes or till just cooked through and very lightly golden, rotating halfway through. Carefully transfer the tart shells to a cooling rack to cool completely.
To fill the tart shells, use unflavored dental floss to slice 1/4-inch-thick rounds of the Oatmeal Creme Pie Cream. Gently press the cream rounds into the tart shells, using your fingers to spread the cream out a little if necessary.
Top each cream-filled shell with a teaspoon-sized dollop of jam, using your fingers to spread it out evenly. If you decide to use my homemade jam recipe, the jam will be a little gushier and easier to spread with a spoon rather than your fingers.
To make the fudgy topping, place the cream and coconut oil in a microwave safe bowl and microwave for 1 minute. Add the chocolate and corn syrup, and stir until completely smooth. If there are some chunks of chocolate that still haven't melted after about three minutes of stirring, microwave for 10 seconds and stir until completely smooth.
Let the mixture cool for about two minutes, stirring occasionally to keep it smooth and fluid. Use a spoon to gently apply an even layer of the chocolate mixture on top of the jam layer. Allow the topping to set at room temperature for 1 hour before serving. Leftover topping can be refrigerated for up to 2 weeks and eaten with a spoon whenever the chocolate craving strikes, or gently reheated and used as an ice-cream topping.
Makes about 36 cookie tarts.
Thanks for reading! Here's to Being the Secret Ingredient in your life.
Wednesday, December 12, 2012
Elf Cookies: An homage to E.L. Fudge
The Setting: A cozy apartment on a chilly winter's day.
The Soundtrack: A marathon of HGTV's Love it or List it. And Oia's lovely warbles.
Steaming up the Oven: Cheese toast.
The Scenario: The Great Food Blogger Cookie Swap and something sweet for Santa's little helpers....
If you follow this blog, you probably know by now I have a bit of an obsession with re-creating childhood treats.
I've never been much of a hard-cookie girl, always opting for Soft Batch over Chips Deluxe.
But if there were one crunchy supermarket cookie that could call me back to childhood as quickly as my treasured, squishy Oatmeal Creme Pie, it would be the firm and buttery Keebler sandwich cookie, shaped like an elf and filled with fudgy goodness--man, those things were good.
So when my recent attempt at Homemade Oreos came out better than I could have imagined, my very first thought was, "I wonder if I could tweak this recipe to make my own version of E.L. Fudge?!"
Aside from switching chocolate out of the cookies and into the filling, I had to get more flavor into the cookies themselves. To accomplish this, I brought a bit of buttermilk powder to the mix to accentuate the flavor of the butter and compliment the chocolate in the filling.
Since these cookies benefit from a richer buttery flavor, the neutral-flavored coconut oil was replaced with more butter, and a touch of malted milk powder was added to round out the flavor profile.
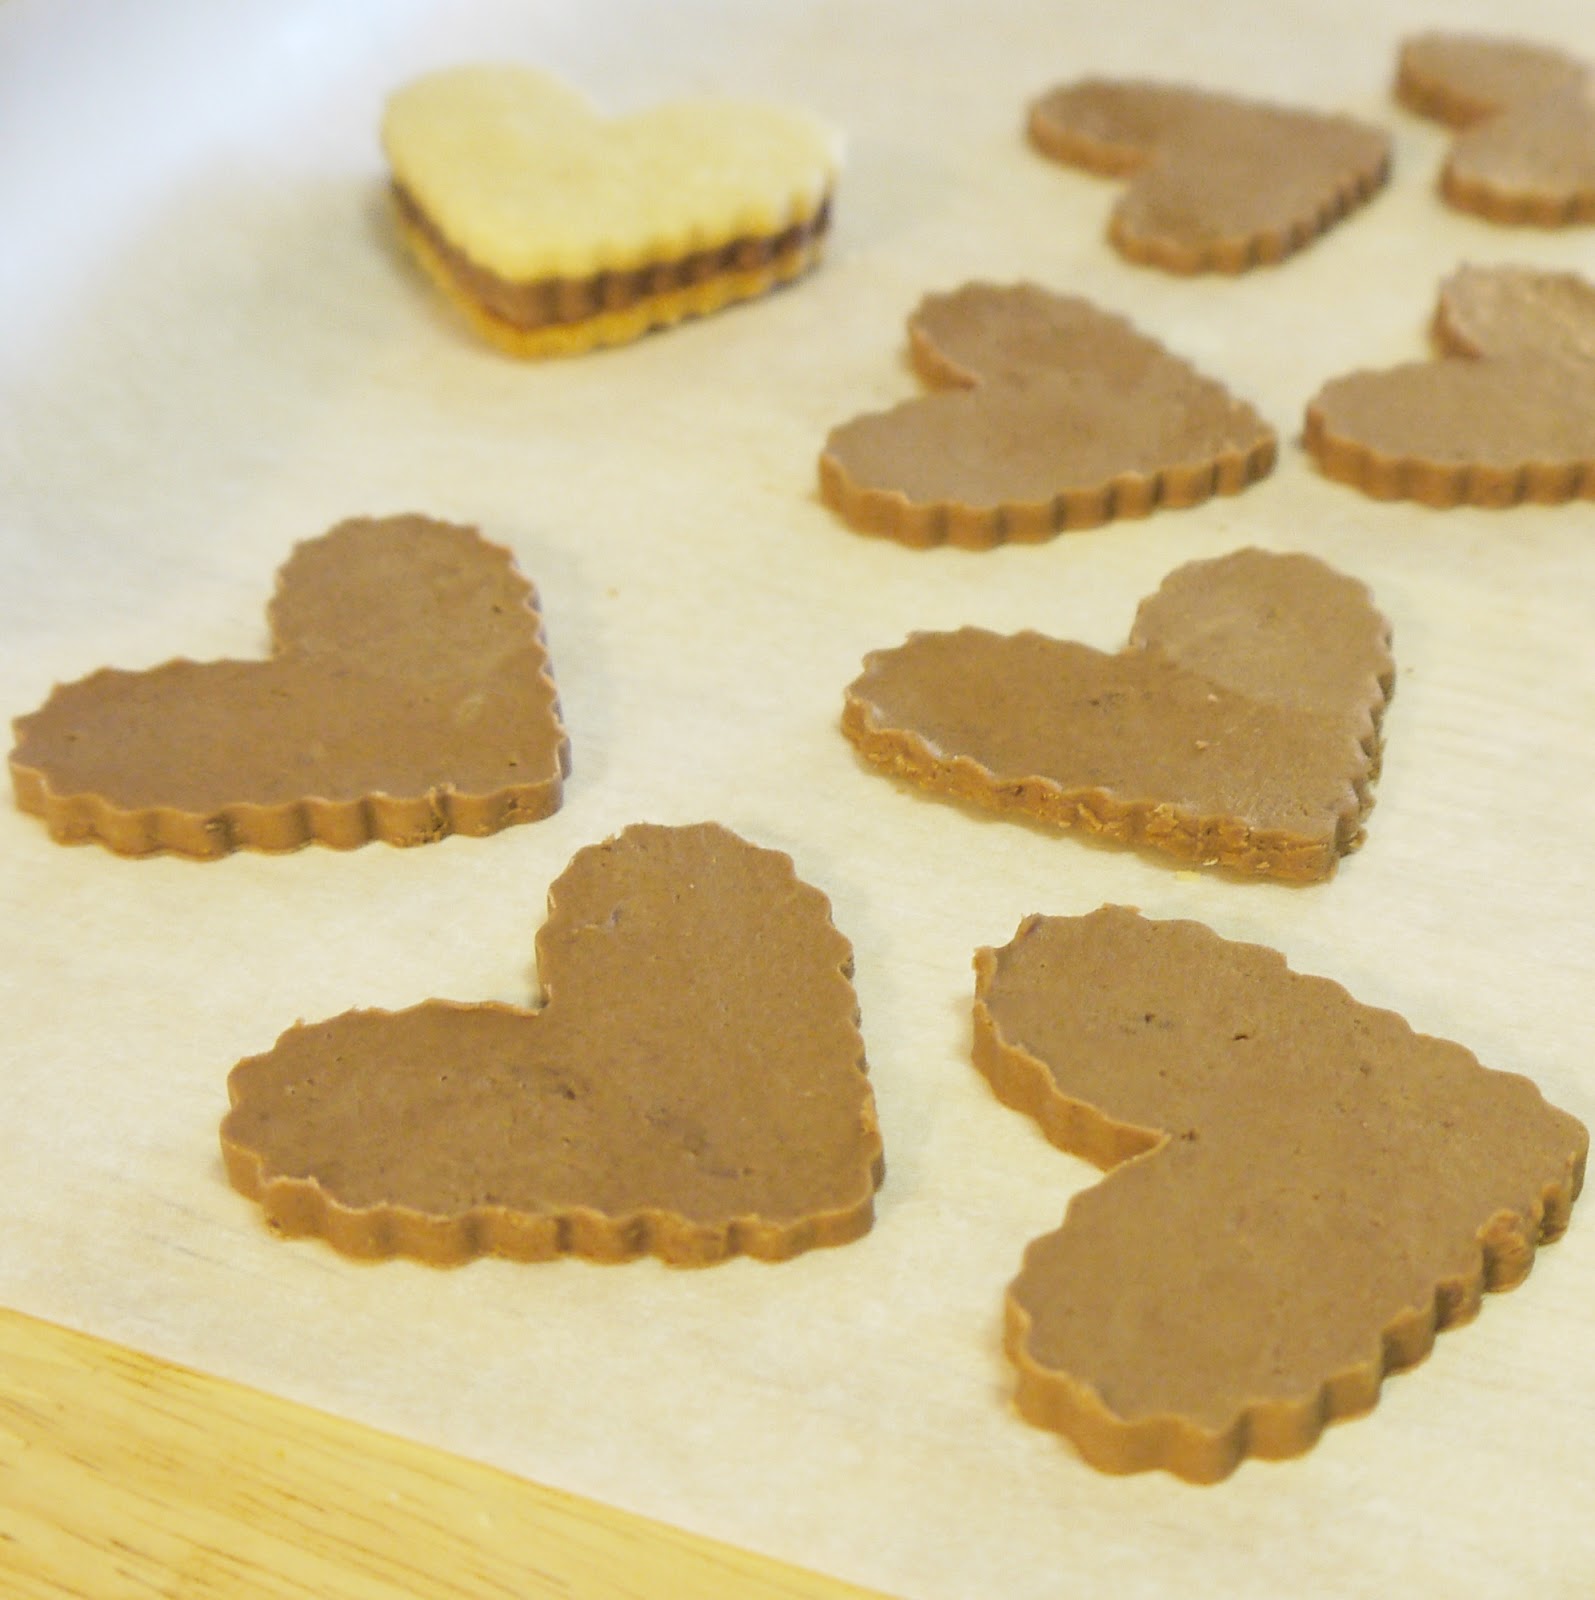
While I wasn't about to track down an elf-shaped cookie cutter for this endeavor, I also knew I wanted a shape quite distinct from the simple, circular Oreos--these are an E.L. Fudge remake, not Oreos gone blond. I used a heart-shaped cutter I had on hand, and I love its rippled edges. Try a two-inch, Christmas-tree-shaped cutter for a more festive alternative.
Elf Cookies
The name Elf Cookies is an homage to their inspiration, Keebler E. L. Fudge--and bonus, it's quite appropriate for the season. Santa always gets cookies for Christmas--why not leave a little something for his helpers?
~for the cookies~
3 cups all-purpose flour
1 T powdered buttermilk
3/4 tsp fine-grain salt
1 tsp baking soda
2 sticks (1 cup) unsalted butter
2/3 cup granulated sugar
1/4 cup corn syrup
1 1/4 tsp pure vanilla extract
~for the filling~
10 T unsalted butter
pinch salt
1 tsp pure vanilla extract
2 1/2 cups powdered sugar
1 tsp malted milk powder
1 cup semisweet chocolate chips, melted and cooled but still pourable
Preheat oven to 350 degrees F. Position a rack in the center of the oven.
In a medium-sized bowl, whisk together the flour, buttermilk powder, salt, and baking soda. Set aside.
Beat the butter and sugar together until light and fluffy. Beat in the corn syrup and vanilla until smooth. Add the flour mixture, beating on low speed until fully incorporated. The dough should be crumbly but malleable.
Turn the dough out onto parchment paper, divide in half, and use wet hands to shape each half into a flat disk.
Working with one half (or disk) of the dough at a time, sandwich the dough between two baking-sheet-sized sheets of parchment paper and use a rolling pin to roll out the dough to a thickness of about 1/4 inch. If the dough is too dry to roll out with out cracking, wet your hands and gently pat the cracked areas back together. Remove the top sheet of parchment and cut out hearts or the shape of your choice. I used a 2-inch-tall, ripple-edged, heart-shaped cookie cutter.
You can either carefully transfer the hearts to a parchment-lined baking sheet, or carefully peel up the excess dough, leaving the hearts where they are, and transfer that sheet of parchment to a baking sheet. Bake at 350 degrees F for 8 minutes. Let cookies cool on the baking sheet for 3-5 minutes before transferring to a cooling rack to cool completely.
Re-roll dough scraps and repeat, using fresh sheets of parchment as
needed. Repeat whole process with remaining half of dough.
To prepare the filling, beat the cold butter along with a pinch of salt until smooth. Add the vanilla and powdered sugar and beat till well-mixed. The mixture should be thick, white, and almost dough-like. Beat in the melted chocolate.
Turn the filling out onto a sheet of parchment paper and divide in half.
Working with one half at a time, roll the filling out between two sheets of parchment until it is between 1/8- and 1/4-inch thick. Use the same cutter you used for the cookies to cut out shapes of the filling. If you feel like the filling is not stiff enough for easily cutting out shapes, place the rolled-out filling (still between the sheets of parchment) on a baking sheet and chill in the fridge for up to 20 minutes.
Place a filling shape on a cooled cookie, top with another cookie, and press very gently to adhere.
Repeat with remaining cookies and filling.
Makes about 40 sandwich cookies.
These cookies were part of the 2012 Great Food Blogger Cookie Swap, which is a little like secret Santa for food bloggers. I shipped these cookies to three participating food bloggers, and I'll get to sample cookies from three different bloggers. This year, each participant paid a small sign-up fee, and all the money went to Cookies for Kids' Cancer. Not a bad way to celebrate the season!
Thanks for reading! Here's to Being the Secret Ingredient in your life.
Subscribe to:
Posts (Atom)
.jpg)