Showing posts with label summer. Show all posts

Wednesday, June 18, 2014

Texas Ruby Red Sparkler (non-alcoholic)


Aside from a good margarita or mojito, I've never been much of a hard liquor gal. Beer or wine, yes; Jack and Coke, no.

Nevertheless, there's something about being pregnant in the summer that brings out hardcore cocktail-envy in me. 

Last Sunday we spent the afternoon working in the garden and preparing an admittedly massive Father's Day feast for Hoosband, and between the Texas heat and the general sense of festivity, I knew my standard jug of water wasn't going to cut it. 

We had just picked up some 100% Texas ruby red grapefruit juice, so I grabbed one of the frosty mason jars Hoosband likes to stash in the freezer for his weekend libations and poured half grapefruit juice and half sparkling water over a mound of glistening ice cubes. 


Perfection.

Hoosband wanted one, too--spiked with Texas' own Tito's Handmade Vodka--so I slipped a rubber band around the neck of mine to avoid any confusion. 

Whether cocktail or mocktail, this is one refreshing bev I'll be sipping on all summer. 


Thanks for reading! Here's to Being the Secret Ingredient in your life.

Monday, August 12, 2013

Sparkling Summer Sangria


A couple of months ago, as part of OXO's Blogger Outreach Program, I received a rather impressive box of summer fruit tools.

I was so excited to dig into the box (and into some juicy summer fruits) and see what kind of goodies I could come up with for the blog, but as you may have read in my last post, things have had me a bit tied up this summer.

Plus, in the midst of settling into our new house here in Texas, enjoying the company of visiting family (Hoosband's and then mine), and shopping for a minivan (that's right, soccer-mom-in-training here, people), we managed to severely wreck the one car we already had.

We were going straight at a green light, and someone left-turned right into us. Hoosband, his mom, and I were a little banged up, but the little one was completely unharmed. The car was totaled, but I'd never felt so blessed.

Adventures aside, it's good to be back at the blog. Summer may be wrapping up--the back-to-school aisles are dominating the stores where swimsuits and sunscreen recently prevailed--but there's still plenty of time to send it off sweetly.

So with that in mind, I present you with Sparkling Summer Sangria: a celebration of perfect peaches, juicy mangoes, candy-sweet pineapple, and the ability to kick back--even for just a moment--with some cold sparkling wine and raise a toast to everything we love about summer.

This is a bit of a before-and-after recipe: it starts as a simple sangria with fresh fruit and wine. After the wine has been consumed, the drunken fruit is blitzed in the blender and frozen into Sangria Cubes that can be plopped into the bottom of champagne flutes and topped off with fresh bubbly whenever the mood strikes--even if summer is long gone.

OXO's Pineapple Slicer, Mango Splitter, and Large Fruit Scoop are the heroes of this recipe--I used to dread cutting mangoes and pineapples, but now I leave their skins and cores trembling in my dust!

I used Cava in the first part of the recipe because it is Spanish (like sangria) and tends to be cheap, but I switched to Andre Extra Dry in round two because it is even cheaper (and actually one of my favorites). I like dry (less sweet) sparkling wines best in this application, but you can use whatever you have on hand.


Sparkling Summer Sangria
1 pineapple
1 mango
1-2 peaches (I used a white peach, but yellow would be fine, too), rinsed and patted dry
1-2 bottles of dry, white sparkling wine, such as Cava, chilled

Cut the pineapple into rings, discarding the skin and core, and place the rings in the bottom of a large glass pitcher (or serving vessel of your choice).


Cut the mango into slices, discarding the skin and core, and place in pitcher on top of the pineapple.


Cut the peach(es) into slices, leaving the skin on but discarding the pit, and place on top of the mango--reserve a few extra-thin slices of peach for garnish, if desired.


Slowly pour the sparkling wine over the fruit, pausing to allow bubbles to subside as necessary.


Use a wooden spoon or plastic tamper from a blender to muddle the fruit if desired--this will distribute the flavors of the fruit into the drink more quickly but will greatly increase the amount of pulp in your poured beverage. The drink can be strained to remove pulp before serving if preferred. Garnish champagne flutes with reserved peach slices, if desired, and serve immediately.


Once the sangria has been consumed, transfer the drunken fruit to a blender and blend till completely smooth. Pour this mixture into ice-cube trays and freeze. 

Transfer the frozen sangria cubes to a large, freezer-safe zip-top bag and store in the freezer until ready to use. 


To serve, place two sangria cubes in each of the desired number of champagne flutes.


Pour chilled sparkling wine over the cubes, pausing to allow bubbles to subside and topping off as necessary.


Thanks for reading! Here's to Being the Secret Ingredient in your life.

Saturday, August 25, 2012

Jeni's Summer Recap


The Setting: A balmy 79-degree-Fahrenheit day. Love it.

The Soundtrack: The whir of the box fan perched in my bedroom window.

On the Stovetop: Kale and mushrooms.

The Scenario: I hope everyone has stayed cool this summer and enjoyed the excerpts from Jeni's Splendid Ice Creams at Home.

Working my way through this colorful cookbook has been a double-scoop of a good time, and I can't wait to break it open again soon when the leaves outside are various shades of  autumn and the flavors of fall begin to beckon--Roasted Pumpkin Five-Spice Ice Cream, anyone?

But for now, as we cling to the final days of summer, I thought I'd offer up a little recap of what we've scooped up so far:

Backyard Mint Ice Cream

Kona Stout Ice Cream

Sweet Corn and Black Raspberry Ice Cream

Homemade Ice Cream Cones

BombeBasticks

If you can't decide on just one flavor to keep you cool before the thermostat starts its autumnal descent (and how could anyone blame you?), why not round up your friends, divide up the flavors, and throw a little ice-cream party to send summer out on a sweet note?


Thanks for reading! Here's to Being the Secret Ingredient in your life!


Monday, July 9, 2012

BombeBasticks

The Setting: A cool apartment in a summer heatwave.

The Soundtrack: The little washing machine that could--I swear I hear it chugging out, "I think I can, I think I can."

On the Stovetop: Wild mushroom tortellini.

The Scenario: I don't know what it's like where you are, but here in the DC area Temperatures are setting record highs, air conditioning units are shutting off because they just can't handle the heat, and "cooling stations" are popping up in churches and gymnasiums to give those without power a moment's sanctuary.

If ever there were a time for a frozen treat, this is it.

Jeni's BombeBasticks are the concession-stand sundae-cones you loved as a kid, all grown up and all from scratch--if, that is, you want them to be.

Make the cones, prepare the chocolate bombe shell, and whip up one of Jeni's Splendid Ice Creams; or swap in store-bought components as you desire.

Top them with peanuts, pretzels, pumpkin seeds--whatever gets your mouth watering the most.

The following recipes are excerpted with permission from Jeni's Splendid Ice Creams at Home. My Notes are in red.


BombeBasticks
"Buttery handmade cones, artfully assembled with ice cream, and encased in Bombe Shell chocolate."

Chocolate Bombe Shell (page 200) (recipe follows)
6 small handmade Ice Cream Cones (page 203)
1 batch any flavor of ice cream
1/2 cup toasted nuts, pretzels, or other crunchy interesting bits

If the chocolate bombe shell is solid, melt gently in a hot water bath (fill bowl with very hot water and place jar of chocolate bombe shell in it), or pulse in the microwave for a few seconds at a time, stirring regularly. You don't want the chocolate to be too hot.

One cone at a time, pour about 1/4 cup chocolate into a cone and swirl to coat the interior.


Pour the excess back into the melted chocolate, and dip the top 1/2 inch of the cone into the chocolate. Set the cone upright in a tall glass and place in the freezer to harden. Repeat with remaining cones.

Soften the ice cream to a scoopable consistency. Remove one cone at a time from the freezer and place a scoop firmly on the top--you don't have to fill the cone, just squish it in really well at the opening. Return the cone to the freezer and repeat with the rest of the cones.

Allow to harden for 1 hour.

Coarsely chop nuts, pretzels, chips, or whatever you want to use and spread on a sheet pan.

Remove one cone at a time from the freezer and dip into the liquid chocolate, rolling to coat. Quickly roll in the nuts, if using, and return to the freezer. Freeze until firm.

Excerpted from Jeni’s Splendid Ice Creams at Home by Jeni Britton Bauer (Artisan Books). Copyright 2011.


Chocolate Bombe Shell
You know that Magic Shell you loved as a kid? Wait till you try the homemade version with real bittersweet chocolate and pure coconut oil!

12 ounces bittersweet chocolate (60% or greater cocoa), chopped
1/3 cup coconut oil I used unrefined, which has more coconut flavor

Combine the chocolate and coconut oil in a double boiler and heat, stirring frequently, until the chocolate is almost melted.

Remove from the heat and stir until completely melted and smooth. Let cool, then store, covered or in a jar, in the refrigerator. The chocolate will keep for up to 3 weeks.

To use the chocolate, you can melt it just by leaving it in a warm place--like the windowsill or the porch--for half an hour or so, then stir until smooth. Or scrape it into a bowl, set it in a larger bowl of very warm tap water, and let stand, stirring occasionally, until liquefied and smooth. You can also melt it in the microwave, heating it for 20-second intervals and stirring often, but be careful not to let it overheat.

Excerpted from Jeni’s Splendid Ice Creams at Home by Jeni Britton Bauer (Artisan Books). Copyright 2011.


Thanks for reading. Here's to Being the Secret Ingredient in your life!

Tuesday, July 3, 2012

Sweet Corn and Black Raspberry Ice Cream with Homemade Ice Cream Cones


The Setting: A dim but otherwise lovely apartment in the DC suburbs, decorated with a pitcher of flowers from my birthday and a smattering of baby paraphernalia...from life.

The Soundtrack: The same three chords pitifully squeaking out again and again as Oia's favorite musical book clings to its last breaths of battery life.

On the Stovetop: Quesadillas.

The Scenario: So far the flavors we've savored from Jeni's Splendid Ice Creams at Home have been fairly standard: 
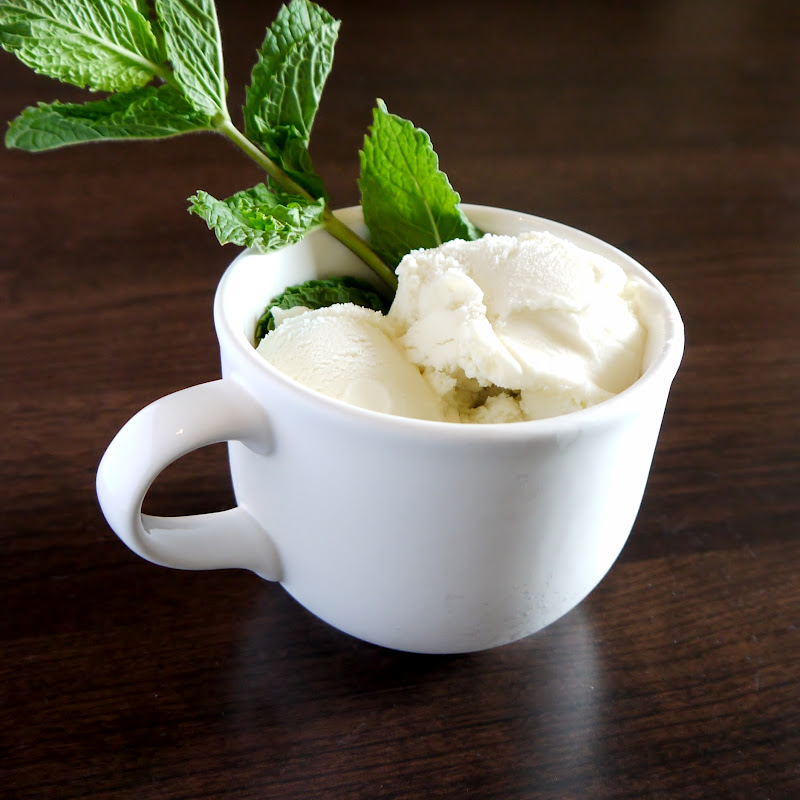
Backyard Mint was a fresh take on an old standby, and while Kona Stout was a far cry from your average coffee ice cream, you could probably imagine ordering a scoop at your favorite brew-pub. Today, however, I bring you excitingly unexpected flavors that collide in a full-on scoop of summer.

This, my friends, is the blessed time of the year when bushels of sweet corn fill the floors of farmer's markets and produce departments, and fresh berries are cheaper than frozen.

This is the time for Sweet Corn and Black Raspberry Ice Cream.

A smooth, sweet base of fresh-corn-steeped cream is frozen in a standard machine and layered with a simple berry sauce to create a surprising treat that'll have you wishing it were summer all year long.

Of course, part of the childlike joy of eating ice cream in the summer is skipping the bowl and spoon in favor of the ever-portable, edible vessel, the cone.

Jeni's recipe produces a sweet and crispy cone good enough to stand on its own but even better when filled.

The batter is extremely simple, but an iron is required (these can be purchased from a variety of online sources and tend to be in the $25- $50 price range).

Jeni says her recipe will make 8 medium cones, but I've been averaging 14 small-to-medium-sized cones from one batch of batter using my 9-inch KrumKake Express, and the whole process takes 30-45 minutes.

Poolside parties and Slip 'N Slides will come to mind as your tongue reaches around the edges of the cone to catch those first drips of ice cream melting in the summer heat.

By the time you're licking your fingers and savoring the last crunch of cone, you'll feel just like a kid again...but with a slightly more elevated palate.

The following recipes are excerpted with permission from Jeni's Splendid Ice Creams at Home. My notes are in red.


Sweet Corn and Black Raspberry Ice Cream
"A sublime summer match--initial hits of milky sweet corn give way to the floral nose of sweet black raspberry." 

1 ear sweet corn, husked
2 cups whole milk
1 tablespoon plus 1 teaspoon cornstarch
1 1/2 ounces (3 tablespoons) cream cheese, softened
1/4 tsp fine sea salt
1 1/4 cups heavy cream
2/3 cup sugar
2 tablespoons light corn syrup
Black Raspberry Sauce (page 196) (recipe follows)

PREP  Slice the kernels from the corn cob, then "milk" the cob by scraping it with the back of your knife to extract the liquid; reserve kernels and liquid.


Mix about 2 tablespoons of the milk with the cornstarch in a small bowl to make a smooth slurry.

Whisk the cream cheese and salt in a medium bowl until smooth. Make sure the cream cheese is fully softened--microwave for 10-15 seconds if necessary--otherwise whisking it is nearly impossible, and it could cause your ice cream to be clumpy.


Fill a large bowl with ice and water.

COOK  Combine the remaining milk, the cream, sugar, corn and juices, and corn syrup in a 4-quart saucepan, bring to a rolling boil over medium-high heat, and boil for 4 minutes. Remove from the heat and force the mixture through a sieve into a bowl, leaving the corn "cases" behind. Return the mixture to the saucepan and gradually whisk in the cornstarch slurry. Bring back to a boil over medium-high heat and cook, stirring with a heatproof spatula, until slightly thickened, about 1 minute. Remove from the heat.

CHILL  Gradually whisk the hot milk mixture into the cream cheese until smooth. Pour the mixture into a 1-gallon Ziploc freezer bag and submerge the sealed bag in the ice bath. Let stand, adding more ice as necessary, until cold, about 30 minutes. You could refrigerate the mixture overnight at this point if desired.

FREEZE  (Snip the corner off your Ziploc bag and...) Pour the ice cream base into the frozen canister and spin until thick and creamy.

Pack the ice cream into a storage container, alternating it with layers of the black raspberry sauce and ending with a spoonful of sauce; do not mix. Press a sheet of parchment paper directly against the surface, and seal with an airtight lid. Freeze in the coldest part of your freezer until firm, at least 4 hours.

Makes 1 generous quart.

Excerpted from Jeni’s Splendid Ice Creams at Home by Jeni Britton Bauer (Artisan Books). Copyright 2011.


Black Raspberry Sauce
2 cups raspberries, black raspberries, and/or blackberries I was unable to find black raspberries, so I used half red raspberries and half blackberries
1 cup sugar

Combine the berries and sugar in a small saucepan and bring to a boil over medium-high heat.


Continue boiling, stirring occasionally, until it reaches 220 degrees F (5 to 8 minutes). I set mine on lower heat and let it cook a lot longer than I was supposed to (probably to the tune of 25 minutes), which made the sauce a little chewy. I actually found the texture rather pleasant, but it made straining out the seeds a major chore.


Let cool slightly, then force through a sieve to remove the seeds. (Or leave a few seeds in there just to prove you made it.) Refrigerate until cold before using.

Makes about 1 1/4 cup.

Excerpted from Jeni’s Splendid Ice Creams at Home by Jeni Britton Bauer (Artisan Books). Copyright 2011.


Ice Cream Cones

2 large egg whites
1/4 cup heavy cream
1/2 cup sugar
1/4 tsp fine sea salt
1 tsp vanilla extract
1 tsp almond extract
5 tablespoons unsalted butter, melted and cooled slightly
2/3 cup all-purpose flour

Turn on the waffle cone iron.

Combine the egg whites and cream in a medium bowl and whisk to combine. Add the sugar, salt, and both extracts and whisk for about a minute to combine well. Whisk in the melted butter. Add the flour, whisking only until the lumps have disappeared and the batter is smooth.

Make the cones in the waffle cone iron according to the directions for your iron. To shape the cones, follow the instructions on the next page (sorry, you'll have to get the book for that...but don't you want to get it anyway?). When you get really good, there should be no hole in the bottom of the cone!

These cones are best the day they are made, but they will keep for a week in a sealed container.

Makes 8 medium cones (4 to 6 inches tall and 2 inches across at the top).

Excerpted from Jeni’s Splendid Ice Creams at Home by Jeni Britton Bauer (Artisan Books). Copyright 2011.


Thanks for reading! Here's to Being the Secret Ingredient in your life.