Showing posts with label st. patrick's day. Show all posts

Monday, March 11, 2013

Irish Ploughman's Lunch


The Setting: 50 and cloudy in Nashville.

The Soundtrack: Various morning shows.

On the Stovetop:
Poached-egg English muffins, courtesy of my mom-in-law.

The Scenario: Looking for something to sustain you this St. Patrick's Day?

Try an Irish Ploughman's Lunch: a humble but hearty assortment of snackables, easy to assemble and munch on, for ploughmen, pub-lovers, and partygoers of all varieties.

The Ploughman, as it's called in passing, may have different components depending on where it's served and what's on hand, but there should always be a minimum of bread, spread, and protein.

Mine has seven components but could certainly be fleshed out with fresh fruits, veggies, and/or additional meats. Here's what I suggest:

Cider-Vinegar Soda Bread


Some folks assert that the bread in a ploughman's lunch simply must be of the crusty baguette variety. While that opinion may hold up in other parts of the UK, in my experience, Ireland calls for soda bread and lots of it. Be it white, brown, or dirty blonde, quick and yeast-less soda bread is butter's best friend, the perfect accompaniment to Irish stew, and an awesome, anytime addition to the Irish table.

This particular recipe gets a flavor boost from unfiltered apple-cider vinegar and is ready for your St. Patrick's Day spread in about an hour.

Homemade Cultured Butter with Celtic Sea Salt


Irish butter is incredible; I've said it time and again. But you can make some pretty incredible butter at home in less time than it takes to go to the store. To make festive shamrocks, or any shape for that matter, simply press fresh butter into molds and place in the refrigerator for at least 30 minutes to harden. Carefully un-mold when ready, and use a paring knife to tidy up the edges if needed.

If you'd prefer to work with store-bought butter but still want festive shapes, simply allow the butter to come to room temperature and beat it up for 30 seconds or so with an electric mixer before pressing it into molds. Make sure to use salted butter (I prefer Kerrygold), or add salt to the mixer (to taste) when beating unsalted butter. I prefer coarse, gray, Celtic sea salt for its flavor and texture, but any salt will work.

Whiskey-Apricot Chutney


Salty and sweet with a hint of hotness from red pepper flakes and warming notes from the whiskey, this savory apricot spread turns humble bread and cheese into an Irish canape. Ready in under an hour, the versatile condiment is a simple way to bring complex flavor to everything from sandwiches to sausages.

Aged Irish Cheddar


The older the better. I prefer cheddars aged at least a year, preferably longer, with the crunchy little tyrosine crystals that come with age. Older cheeses tend to be stronger in flavor and drier in texture. If you prefer a milder, creamier cheese, go with something young. Another exceptional and accessible Irish cheese is Kerrygold's Dubliner, a flavorful but approachable cheese, somewhat like a hybrid of cheddar, Parmesan, and Gruyere.

Refrigerator Pickles


Pickled onions tend to be more common in the UK than the pickled cucumbers we love in the US. These refrigerator pickles bring both onions and cucumbers to the party for the best of both sides of the pond. Easy to make and long-lasting in the fridge, they provide a pleasant vinegary accent to everything from the Irish Ploughman to American favorites like BBQ and fried chicken.

Hard-Boiled Eggs
Packed with protein and easy to come by, hard-boiled eggs are the perfect fuel for the Ploughman. Place eggs in a saucepan and cover with cold water. Generously salt the water and bring to a boil. When the water has reached a rapid boil, cover and remove from the heat. Let set for 16 minutes. Gently pour off the cooking water and run cold water over the hot eggs to cool down. Peel once cool.

Sausage Crisps
This is not particularly Irish (I used an Italian calabrese), but sausage crisps make a nice addition to any snack or platter. To make the crisps, thinly slice a fatty, cured sausage and arrange slices in a single layer on a cooling rack placed over a rimmed baking sheet. Bake at 350 degrees Fahrenheit for 10 minutes or until the slices are all crisped up, like little meat chips. Perfect for dipping or simply for munching.

Not into the whole sausage-crisp concept? Any cured sausage or meat (even prosciutto or a Spanish ham) will do, no crisping required. For even more of an Irish flair, try smoked Atlantic salmon in addition to (or in place of) these meaty options.

Serve the Ploughman's Lunch with pints of stout, or your favorite Irish brew.

Slainte!

Thanks for reading! Here's to Being the Secret Ingredient in your life.

Sunday, March 10, 2013

Homemade Cultured Butter with Celtic Sea Salt


The Setting: A balmy day at my in-laws' home in Nashville. 

The Soundtrack: Birds, corgis, wind chimes, family.

Satisfying my Sweet Tooth: A mammoth apple fritter from the Donut Den.

The Scenario: Making a butter that's worthy of your favorite bread.

One of my favorite field trips as a kid was to an old historical site where we kindergartners got to make our own butter just like they did in the old days--okay, the early settlers used churns, and we used babyfood jars and added yellow food coloring to the cream...but other than that it was just like in the old days.

Twenty-something years later, I got a new favorite field trip: a visit to a Kerrygold creamery in County Cork, Ireland. I didn't get to shake any jars, but I got to sneak a peak as pristine machines churned snow-white milk into golden-yellow butter, no food-coloring required.


The Irish butter, made from cultured cream collected from grass-fed cows from a farmer-owned co-op, was the best I'd ever tasted.

My former love, the sweet-cream (uncultured) butter ubiquitous in the States, was suddenly yesterday's garbage.

I dreamed of owning a creamery one day where I'd churn out vats and vats of my very own cultured butter.

The dream always seemed so distant until a month or so ago, when Hoosband and I attended a cheese-making class at Standing Stone Farms outside of Nashville.

Our gifted instructor, Paula Butler, led us through a butter-making demonstration and explained how we could take our homemade butter to the next level by adding a pinch of powdered mesophilic culture to the cream the night before churning.

Presto! Cultured butter.

The butter can be "churned" in a stand mixer, blender, or even by hand (if, you know, you're training for an arm-wrestling tournament or something).

I use a Vitamix, which takes about a minute and a half. The danger of using a high-powered blender is that it could shatter the butter before you realize it's ready, making it harder to drain and resulting in a somewhat inferior texture. Whatever method you choose, just keep an eye on the cream. The moment you see clear liquid (and solid white chunks), you are done.

It's highly important to strain off all the liquid at this point because the buttermilk (yes, this watery stuff is real buttermilk) is highly perishable (best used within a few hours) and will greatly diminish the shelf life of the butter if not completely drained off.

Once the buttermilk has been drained off, season the butter with salt. YOU MUST ADD SALT. If you do not, the butter, in all its beautiful, homemade glory, will taste like nothing. You can add any salt you like. I like coarse, gray, Celtic sea salt the best. It has great flavor, and the coarse-but-somewhat-soft crystals provide tiny bursts of texture in the creamy, smooth butter.

The butter can be made in any quantity and is a great use for any half-spent cartons of cream lurking around the fridge. Never let unused cream spoil on you again!

Mesophilic culture can be easily sourced on the Internet or from cheese-making shops. If you don't feel like adding the culture, simply omit it. Homemade sweet cream butter is still pretty fabulous.


Homemade Cultured Butter
The cream needs to be at room temperature--60-70 degrees F. I leave my cream out on the counter for 8 hours to warm up and let the culture do its thing. This is 4 hours longer than food safety rules allow. If this is a concern for you, do not leave the cream out for more than 4 hours. 

heavy whipping cream (grass-fed and organic if possible)
pinch of powdered mesophilic culture
salt, to taste

At least 4 hours before you'd like to make your butter, add a pinch of mesophilic culture to the carton of cream and leave the cream out at room temperature to warm up. I suggest starting with a small pinch of the culture and experimenting with quantities each time you make butter until you find your magic amount.

When ready to make the butter, pour the cream into a blender.


Turn on the blender and blend on high just until you see clear liquid and/or solid chunks. With a Vitamix, this should take 1-2 minutes. First it will turn to whipped cream. The mixer will seem to stall out for a few seconds after this. Suddenly, the cream will start to move again, and very shortly thereafter you will have butter. But it won't look like butter yet.

It will look something like this--note the separation of solids and liquid.


If you would like to keep the buttermilk to drink, cook with, or add to coffee in the immediate future, strain the buttermilk into a bowl and set the liquid aside before rinsing the butter with ice-cold water to wash off any remaining buttermilk--otherwise go straight to rinsing.


Use a rubber spatula to help press out any liquid.


Lightly pat dry with a paper towel and use a spatula to mix in the salt. Taste the butter to see if you need more salt. Place the butter on a sheet of parchment or plastic wrap and roll into a ball or log--alternatively, press into molds.


Store the butter in the fridge for up to one week, or freeze for later use.


Thanks for reading! Here's to Being the Secret Ingredient in your life.

Saturday, March 9, 2013

Whiskey-Apricot Chutney


The Setting: Back in Nashville for a few days! It's amazing how 50 degrees (F.) feels like swimsuit weather when you're used to 5-below and snowstorms.

The Soundtrack: Something on the Food Network.

Steaming up the Oven: Nothing today. Waffle House for Breakfast and Which Wich for lunch!

The Scenario: A savory-sweet spread gets all spiked up.

In my previous life as a specialty-foods buyer for a major retail chain, my eyes were opened to the sweet and salty, slightly spicy and subtly sour world of chutneys and their surprising affinity for cheese.

If you want to elevate a block of cheddar, for instance, from a mid-day snack to an appetizer fit for company, pair it with Virginia Chutney's Spicy Plum or Hot Peach, and watch as guests go back for more.

I thought I'd put a Tennessee spin on this classic old-country condiment with the unexpected addition of Lynchburg's finest. The whiskey cooks down considerably, deepening the flavor and leaving a subtle warmth with no harsh bite.


Use Irish whiskey (if you prefer) and pair with Irish cheddar and soda bread for a hearty St. Patrick's Day snack, or puree with a drizzle of soy sauce anytime for an incredible (and impressive) pot-sticker dipping sauce or glaze for chicken or pork.


Whiskey-Apricot Chutney
1/2  cup whiskey
1 cup chopped dried apricots
1 small onion, chopped
2 T butter
1/2 tsp freshly cracked black pepper
1/2 tsp crushed red pepper flakes
1/4 cup brown sugar
1 tsp kosher salt
the juice from half a lemon

In a small bowl or cup, soak the apricots in the whiskey. Set aside.


Add the onion, butter, black pepper, and red pepper flakes to a nonstick skillet over med-high heat.


Once the butter has melted and the onions have begun to soften, give the mixture a stir, add the brown sugar to the top, cover, and cook 20 minutes over med-low heat, stirring once halfway through.


Uncover, remove from heat, and stir in the salt, lemon juice, and the apricots along with the whiskey.


Return to med-high heat and cook, uncovered, for 15 minutes, or until most of the liquid has evaporated and the remaining liquid looks like syrup.


Let cool before transferring to an airtight container to store in the fridge. Store the chutney this way for up to two weeks.


Thanks for reading! Here's to Being the Secret Ingredient in your life.

Wednesday, March 6, 2013

Cider-Vinegar Soda Bread


The Setting: The day after a snow storm.... The roads are now clear, but my car is still buried. I think I'll be staying in today.

The Soundtrack: Boy Meets World (I'd say it was on for the wee one, but we all know I'm just indulging my inner twelve year old).

On the Stovetop: Cabbage and onion soup.

The Scenario: When snow storms roll in, the oven warms up.

Winter may be almost over, but here in the Midwest, it's still soup-and-soda-bread weather.

More than just a staple on St. Patrick's Day tables, soda bread is a hearty, make-anytime treat that can be mixed up, shaped, and pulled from the oven in little more than an hour--no rising or forethought necessary.

Traditionally, buttermilk (acidic) and baking soda (basic) are used to give this loaf its lift. This version uses acidic and flavorful unfiltered-cider vinegar instead of buttermilk to activate the baking soda, resulting in an especially tangy loaf with a pleasing complexity.

If you can't find (or don't want to use) a raw, organic, unfiltered-apple-cider vinegar (such as Bragg or Spectrum Naturals) add a pinch of yeast to regular cider vinegar (when you mix it with the milk) to approximate the taste.

I like to use a mixture of unbleached all-purpose flour and whole-wheat pastry flour to keep this loaf tender. If you don't have pastry flour, substitute 1/4 cup cornstarch for an equal amount of the flour. This will reduce the amount of gluten in the recipe and help prevent the bread from becoming too tough.

As with all quick-breads, it is also important to work the dough as little as possible after adding the liquids to keep gluten-development (and thus toughness) to a minimum.

Whether topped with butter and jam or dunked in stew, this bread is best served within a few hours of baking. Leftovers, however, make excellent toast.


Cider-Vinegar Soda Bread
1 3/4 cups milk (skim is fine)
1/4 cup unfiltered apple cider vinegar (or regular apple cider vinegar plus a pinch of yeast)
2 cups whole wheat pastry flour
2 cups all-purpose flour
1 1/2 tsp baking soda
1 1/2 tsp fine salt
2 tsp malted milk powder
2 T brown sugar
3 T cold, unsalted butter, chopped into pieces
1 T butter, melted

Preheat the oven to 400 degrees Fahrenheit. Line a baking sheet with parchment paper.

In a small bowl combine the milk and cider vinegar (plus yeast, if using). Set aside.


In a large bowl whisk together the flours, soda, salt, malted milk powder, and brown sugar until thoroughly mixed.


Use a pastry cutter (or fork) to cut the butter into the flour mixture, raking the chunks of butter through the dry ingredients until the mixture resembles fluffy, slightly damp sand.


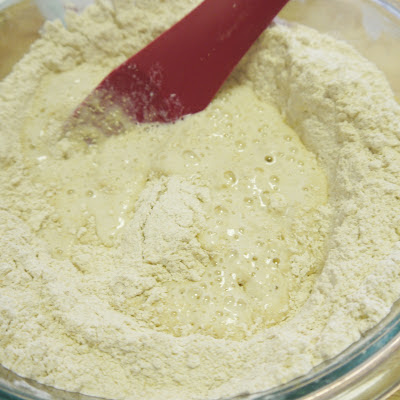
By now the milk mixture should look like this:


Use a wooden spoon or rubber spatula to slowly incorporate the milk mixture into the flour mixture, striving to get the dry ingredients as evenly wet as possible, while working the dough as little as possible. Use your hands to finish incorporating the dry ingredients, adding an extra teaspoon or so of milk if needed.


Pat the dough into a round loaf and place it on the prepared baking sheet. Brush the top of the dough with the melted butter and use a paring knife to slice an X across the top of the loaf.


Bake at 400 degrees Fahrenheit for 40 minutes, rotating the pan halfway through for even cooking. Let cool at least 15 minutes before cutting.

Once completely cool, store tightly wrapped at room temperature. Eat or freeze within two days.

Thanks for reading! Here's to Being the Secret Ingredient in your life.


Sunday, March 3, 2013

Mini No-Bake Irish-Cream Cheesecakes


The Setting: The end of a slow and lazy Sunday in the wintry Midwest.

The Soundtrack: King of the Hill.

On the Stovetop: Kale frittata.

The Scenario: Recalling the perfect ending to an Irish meal...or any meal, really.

My first meal in Ireland (September 2010) set the tone for an unforgettable culinary adventure: loads of brown bread and butter to start, creamy roasted vegetable soup and deliciously flaky salmon in the middle, and a lovely, individual Irish-cream cheesecake to end on.

The cheesecake was light and creamy with a subtle hint of coffee and a crumbly chocolate-chip cookie crust. I knew right away I wanted to re-create it at home, but I was afraid I wouldn't do it justice.

The cheesecake's mousse-like texture and lack of skin on top suggested it was of the no-bake, gelatin-set variety. I had never attempted this kind of cheesecake, but I had worked with gelatin in culinary school and hoped I could figure it out.

The basic rules to working with powdered gelatin are these:

1. Let the gelatin absorb a small amount of liquid for about five minutes. This is called blooming because the gelatin gets all puffy and swollen.

2. Melt the gelatin so that it can be incorporated into the remaining ingredients.

3. Mix the gelatin into the remaining ingredients while it's still warm and fluid. This is a critical stage. If the gelatin starts to solidify before it's fully incorporated into the base mixture, the cheesecake will have gelatin blobs running throughout, like tiny little gummy snacks--not the worst thing ever, but certainly not the smooth cheesecake texture we're going for.

4. Chill the mixture to let the gelatin set. These mini cheesecakes will set within about one hour, but the texture and flavor will be better after several hours and even better on day two.

Even the crust on these no-bake cheesecakes is un-baked. It's meant to be a little on the crumbly side and only uses 1 T butter to bind the crumbs together. The key is to really compact the moistened crumbs down in the muffin liners to make them stick together. The result is a crust that stays together when you take it out of the liner but crumbles easily under your fork.

The cheesecakes are fine unadorned--I ate several this way because I was feeling lazy and impatient. They will, however, look and taste a little like something's missing.


To dress them up, I tried to make a whipped topping out of coconut cream (the thick, fatty layer from the top of a can of coconut milk) but I couldn't get it to hold soft peaks. I had to add a hefty amount of actual cream to get it to whip up, but the subtle flavor from the coconut cream was nevertheless delightful. Whether you choose to go this route or stick to an all-dairy-cream approach, definitely go for a topping of some sort. For the final touch, I like to use a cheap veggie peeler to lightly grate flecks from a block of semisweet baking chocolate right over the top.


Mini No-Bake Irish Cream Cheesecakes
1 3/4 cups chocolate-chip-cookie crumbs (I used about six Gluten-Free Double Chip Cookies, processed to crumbs in the food processor)
1 T butter, melted
3/4 cup heavy cream, divided
1 envelope unflavored gelatin
8 oz reduced fat cream cheese, softened at room temperature
1/2 cup sugar
1/8 tsp fine salt
1/2 cup Irish cream liqueur
whipped cream and dark chocolate shavings, for garnish

Combine the cookie crumbs and the melted butter, attempting to moisten the crumbs evenly.


Divide the moistened crumbs evenly among the 12 cups in a standard-sized muffin pan lined with muffin liners.


Use a spoon (or your hands) to press the crumbs very firmly into the bottoms and partially up the sides of the cups. Set aside.


Whisk together the gelatin and 1/4 cup heavy cream in a small, microwave-safe bowl.


Set aside and allow to "bloom" for 5 minutes.

Meanwhile, beat together the cream cheese, sugar, and salt on med-high speed till smooth and creamy. With the mixer on low speed, slowly pour in the Irish cream and remaining heavy cream. Increase the speed to medium and beat till smooth and creamy, 1-2 minutes. scraping down the bowl as necessary.

After the gelatin has bloomed (basically absorbed a good bit of the cream) for 5 minutes, microwave the gelatin mixture for 25 seconds to melt the gelatin. Whisk in the espresso powder.


With the mixer on med-low, slowly pour the melted gelatin mixture into the cream cheese mixture. Increase speed to med-high and beat till fluffy and voluminous, about 2 minutes.


Divide the mixture evenly among the cookie crusts and refrigerate for at least one hour, optimally 6-8, before serving.


To serve, carefully remove the liner from one of the cheesecakes, place on a plate, and top with a dollop of whipped cream and a grating of dark chocolate for some finishing flavor and flair.

Makes 12 mini cheesecakes.


Thanks for reading! Here's to Being the Secret Ingredient in your life.