Pages

Friday, December 21, 2012

Biscoli


The Setting: A dark and stormy day.

The Soundtrack: House Hunters.

On the Stovetop: Nothing yet.

The Scenario: Biscoff Mania continues with possibly the best thing I've ever made.

Okay, here's the deal. I've been going back and forth over whether to write this post now or wait until I could take more drool-inspiring photos of this ridiculous dessert, but NOW won for two reasons.

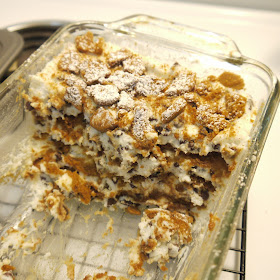
A) I've tried twice, and I just don't think I can capture Biscoli's awesomeness in photo form.

and

B) I felt like it was necessary to get this out into the blogosphere in time for it to make its way onto Christmas menus--maybe even yours.

So don't let the sub-par photos fool you. This delicious combination of Biscoff cookies and cannoli filling is easy to prepare, make-ahead convenient, and show-stopping good.

Make it in a loaf pan and serve it with a spoon for casual get-togethers or potlucks, or double the recipe and make it in a springform pan for a more stunning, slice-able Biscoli Cake.

Either way, make it, make it, you've got to make it! Promise?


Biscoli
For the Biscoli Cake variation, double the recipe (except for the vanilla bean--one of those will be enough) and layer the cookies and filling in a springform pan instead of a Pyrex loaf pan. Place the pan in the freezer for 10-20 minutes before serving  to help firm up the edges. Top with crumbled cookies and sprinkle with powdered sugar and cinnamon. Place the pan on a cake stand if desired. Run a knife around the inside of the pan before removing the springform edge. Use a cake knife to cut and serve.

15 oz whole-milk ricotta
1/2 cup heavy whipping cream
1 T orange marmalade
1 cup powdered sugar
1 vanilla bean
1 tsp Marsala wine (substitute with pure vanilla extract if desired)
1 cup mini semisweet chocolate chips
1 package Biscoff cookies (crumbled, whole, or in pieces) (you'll have some leftover)
extra powdered sugar and cinnamon for sifting over the top

Combine the first six ingredients (ricotta through Marsala) until smooth. I like to do this in a food processor for extra smoothness, but you could use an electric mixer or even a whisk if desired.


Stir the chocolate chips into the ricotta mixture.


Layer cookies evenly into the bottom of a Pyrex loaf pan.


Pour one quarter of the filling mixture over the cookies. Repeat until you have four layers each of cookies and filling.


(In a springform pan you will have fewer layers)


Cover and refrigerate for at least 6 hours or up to two days.When ready to serve, crumble more Biscoff cookies over the top and dust with powdered sugar and cinnamon (I just put a little of each in one sieve and shake it over the top).


Thanks for reading! Here's to Being the Secret Ingredient in your life.


Wednesday, December 19, 2012

Apple Butter Poptarts with Maple Glaze and Toasted Pecans


The Setting: Casa de mi madre.

The Soundtrack: "Milk! Milk! Up! Up!" and other baby babbles.

Steaming up the Oven: Nothing yet.

The Scenario: It's beginning to look a lot like breakfast.

In the event you're looking for something special to serve up Christmas morning, here's a festive spin on a childhood favorite, sure to please young and old alike.

With a light, flaky, butter crust, a filling made of spiced apple butter, cream cheese, and pecans, and a sweet maple glaze, these homemade poptarts are happy holidays in a pretty, pastry package.


Apple Butter Poptarts
1 recipe Butter Crust dough (using whole-wheat pastry flour, if desired)
1 cup apple butter
2 oz cream cheese
1/2 cup pecan halves
2 tsp cornstarch

~for the maple glaze~
1 T butter
1/4 cup pure maple syrup
1/2 tsp pure vanilla extract
2/3 cup powdered sugar
1/2 cup chopped pecans, for garnish

Place the apple butter, cream cheese, pecan halves, and cornstarch in a food processor and process till completely smooth. Set aside. The filling can be made up to a week in advance and stored in an airtight container in the fridge until 30 minutes before use. Excess filling can be added to oatmeal or used as a filling for stuffed French toast.


Preheat the oven to 350 degrees F. Roll out the dough to a thickness of about 1/8-inch. Use a pizza cutter to trim the dough into a rectangle, using a ruler or tape measure to help divide into even, 2x3-inch rectangles.


Spread a heaping tablespoon of filling over half of the rectangles, leaving a 1/4-inch border.


Place a naked rectangle on top of each filled rectangle.


Use the tines of a fork to crimp and seal the edges.


Poke a few rows of holes in the tops of the tarts with the fork to create a steam release.

Re-roll and repeat with dough scraps.


Carefully transfer the tarts to a parchment-lined baking sheet and bake at 350 degrees F for 17 minutes or baked through and just golden around the edges.

Let cool a minute or two on the baking sheet; then carefully transfer to a cooling rack to cool completely. Tarts may be prepared ahead of time up to this point and frozen for up to one month if desired. Before freezing, wrap very well in plastic wrap and then aluminum foil. To defrost, leave out at room temperature, still wrapped, for 3-4 hours or until thawed.


Toast the chopped pecans in a dry skillet over medium heat just until fragrant, being careful not to burn. Set aside.

To prepare the glaze, melt the butter in a microwave-safe bowl or Pyrex measuring cup. Whisk in the remaining ingredients until smooth. Use a spoon to spread the glaze over the tarts, sprinkling each tart with the toasted pecans as you go (if you wait until they are all glazed, the pecans won't adhere as well). To reduce mess, you can place the cooling rack over a sheet of aluminum foil or the baking sheet lined with parchment before glazing.


Let the glaze set for a few minutes before trying to stack or layer on a platter.


Store leftovers tightly wrapped at room temperature. Best consumed within two days, with a room full of loved ones and a side of holiday cheer.

Makes about 12 breakfast pastries.


Note: For another festive alternative, make Pumpkin Pecan Poptarts by swapping out the apple butter with 1 cup pumpkin puree, plus 1/4 cup brown sugar, 1 tsp cinnamon, and 1/4 tsp 5-spice powder (optional).

Thanks for reading! Here's to Being the Secret Ingredient in your life.

Tuesday, December 18, 2012

Hot Whipped Chocolate


The Setting: Hanging with the fam in Nashville.

The Soundtrack: Ink Masters.

On the Stovetop: Eggs.

The Scenario: Bringing to life an old memory.

I went to my first dinner party when I was about eight.

A friend of my mom was the generous (and brave) host.

In those days I was a bit of a pain when it came to food--I had the bad reputation in the sleepover circuit as The Picky Eater.

I don't know if our host had been forewarned of what she was getting into inviting me to her elegant table that night, but I easily recall her composure and graciousness.

Sadly, I have no idea what we were served for dinner or whether there were special child-friendly offerings--surprise, surprise, I only remember dessert.

When dinner plates were cleared, the adults were given mugs of something chocolaty, delicious-looking, and, unfortunately for me, spiked with alcohol. I did not understand why I could not partake, and, as the promise of dessert was the only worthwhile part of any meal to me in those days, I was quite upset.

Before I could thoroughly embarrass my mother and escalate into full-tantrum mode, however, our expert hostess placed a mug in front of me. She scooped a mound of fluffy, cloud-like chocolate into the mug and said, "Let's see how you like this," as she slowly poured steaming milk over the chocolate cloud.

I watched in wonder as the cloud slowly melted into creamy, frothy hot chocolate. Everyone smiled as my eyes shot up in excitement after my first sip.

Interactive, visually stunning, and delicious, it made an impression.

It's easy to tailor this hot chocolate to children, adults, coffee addicts, or candy fiends to customize the conclusion of any dinner party or holiday meal.

Prepare the chocolate ganache up to five days ahead of time. When ready to serve, simply whip it up with an electric mixer, scoop it into mugs, and top with hot milk. A quick stir yields perfectly smooth, creamy, steamy drinking chocolate.

Use skim milk for lighter, thinner results and half-and-half for a little more indulgence. Coffee can be used in place of some or all of the milk to make a mocha; Bailey's, Kahlua, or Frangelico turn it 21-and-up. Stir in crushed peppermint bark for a festive holiday treat, or top with homemade marshmallows for extra decadence.


Hot Whipped Chocolate
This hot chocolate is composed of two parts: a ganache that can prepared up to five days ahead of time, and hot milk or coffee that is poured over the whipped ganache right before serving.

~for the ganache base~
1 cup finely chopped dark chocolate
1 vanilla bean
1 1/2 cups heavy whipping cream

~for the hot chocolate~
1 gallon milk
(optional: brewed coffee, Irish cream liqueur, or another liqueur)
(optional toppings: crushed Peppermint Bark, marshmallows, chocolate shavings)

To make the ganache, place the chocolate in a med-large mixing bowl. Split the vanilla bean lengthwise and use the dull side of a paring knife to scrape out the seeds and add them to the bowl with the chocolate.

Place the cream in a microwave-safe bowl or Pyrex measuring cup and microwave 1 minute or till very not but not boiling. Pour the cream over the chocolate and stir until smooth.


Pour the chocolate ganache into a shallow baking dish and let cool to room temperature. Cover and refrigerate until ready to use (up to 5 days).

When ready to serve, scrape the cooled ganache into a mixing bowl and beat with an electric mixer until light, airy, and voluminous.

Use an ice-cream scoop to divide the whipped ganache evenly among eight mugs.


To prepare the hot chocolate, bring the milk to a simmer. Pour hot milk over the ganache in each mug, leaving enough room for any optional additions you might desire (alternatively, substitute hot coffee entirely for the milk).


Stir till smooth, adding any optional additions if desired.

Serves 8.


Thanks for reading! Here's to Being the Secret Ingredient in your life.

Monday, December 17, 2012

Warming up with Panera Soups


The Setting: My mom's kitchen table--we're home for the holidays!

The Soundtrack: Bing Crosby.

On the Stovetop: My mom's turkey chili.

The Scenario: As part of the DailyBuzz Food Tastemakers program, I received a stipend to taste and blog about Panera soups. From old favorites to new, it was a very tasty assignment.

When I started college at Auburn University, Panera Breads had not yet expanded to that particular corner of rural Alabama.

My roommate and I, who had both fallen in love with Panera on visits to other college towns, would often drive 45 minutes each way to a Panera in Montgomery just to get our carb fix. We were addicted.

From my little dorm-room desk, I frequently emailed the chain, asking that they please, please, please open a store near my school.

Soon my dreams came true. I was first in line when the doors were unlocked on opening day, and if I had spent half as much time in class as I had in Panera after that, I'd be a whole lot more employable now.

Bagels and Hazelnut Cream Cheese were my weakness, but the hearty, low-fat soups were a pleasure I could partake in even when trying to overcome that pesky college weight-gain.

And when nights were long and drinks were cheap, there was no morning-after headache that a bowl of Panera Chicken Noodle Soup and hunk of crusty bread couldn't fix.

These days, I'm in a new college town, in a very different place in my life, and though there is a Panera nearby, I rarely make it that way.

So when I got the excuse to grab some Panera soup the other day, I was excited to share the experience with Hoosband and the little one.


Oia is a big fan of soup, or "Doup! Doup!" as she likes to say. She happily slurped down a good portion of our Low-Fat-All-Natural Chicken Noodle Soup on this trip.

Though the chicken noodle soup was not quite as comforting as I remember from my college days (I feel like the noodles used to be a bit puffier and the broth ever-so-slightly thicker with just a pinch more salt), it's definitely a comfort to know its natural, hormone-free chicken is something I can feel good about sharing with my daughter when we're dining out.


Hoosband and I are big clam chowder fans, so we had to try that one as well, and we agreed it was the show-stopper of the evening.

Every bite called us back to our recent trip up the Northeast coast, where clam is king. The creaminess of the soup is cut just right with the briny essence of fresh clam nectar, and little bites of clam mingle happily with perfectly cooked potatoes. It's amazing how much flavor is packed in every velvety bite!


The Sourdough Bread Bowl makes the perfect vessel, implement, and accompaniment, as its pillowy interior absorbs the soup, and its rustic exterior crunches in contrast.

We may no longer be undergrads in search of a taste of home or a hangover cure, but with the cold Midwestern winter ahead, we'll certainly need some comfort food. And it seems Panera is still the place to go.


Thanks for reading! Here's to Being the Secret Ingredient in your life.

Wednesday, December 12, 2012

Elf Cookies: An homage to E.L. Fudge


The Setting: A cozy apartment on a chilly winter's day.

The Soundtrack: A marathon of HGTV's Love it or List it. And Oia's lovely warbles.

Steaming up the Oven: Cheese toast.

The Scenario: The Great Food Blogger Cookie Swap and something sweet for Santa's little helpers....

If you follow this blog, you probably know by now I have a bit of an obsession with re-creating childhood treats.

I've never been much of a hard-cookie girl, always opting for Soft Batch over Chips Deluxe.

But if there were one crunchy supermarket cookie that could call me back to childhood as quickly as my treasured, squishy Oatmeal Creme Pie, it would be the firm and buttery Keebler sandwich cookie, shaped like an elf and filled with fudgy goodness--man, those things were good.

So when my recent attempt at Homemade Oreos came out better than I could have imagined, my very first thought was, "I wonder if I could tweak this recipe to make my own version of E.L. Fudge?!"

Aside from switching chocolate out of the cookies and into the filling, I had to get more flavor into the cookies themselves. To accomplish this, I brought a bit of buttermilk powder to the mix to accentuate the flavor of the butter and compliment the chocolate in the filling.

Since these cookies benefit from a richer buttery flavor, the neutral-flavored coconut oil was replaced with more butter, and a touch of malted milk powder was added to round out the flavor profile.

While I wasn't about to track down an elf-shaped cookie cutter for this endeavor, I also knew I wanted a shape quite distinct from the simple, circular Oreos--these are an E.L. Fudge remake, not Oreos gone blond. I used a heart-shaped cutter I had on hand, and I love its rippled edges. Try a two-inch, Christmas-tree-shaped cutter for a more festive alternative.


Elf Cookies
The name Elf Cookies is an homage to their inspiration, Keebler E. L. Fudge--and bonus, it's quite appropriate for the season. Santa always gets cookies for Christmas--why not leave a little something for his helpers?

~for the cookies~
3 cups all-purpose flour
1 T powdered buttermilk
3/4 tsp fine-grain salt
1 tsp baking soda
2 sticks (1 cup) unsalted butter
2/3 cup granulated sugar
1/4 cup corn syrup
1 1/4 tsp pure vanilla extract

~for the filling~
10 T unsalted butter
pinch salt
1 tsp pure vanilla extract
2 1/2 cups powdered sugar
1 tsp malted milk powder
1 cup semisweet chocolate chips, melted and cooled but still pourable

Preheat oven to 350 degrees F. Position a rack in the center of the oven.

In a medium-sized bowl, whisk together the flour, buttermilk powder, salt, and baking soda. Set aside.

Beat the butter and sugar together until light and fluffy. Beat in the corn syrup and vanilla until smooth. Add the flour mixture, beating on low speed until fully incorporated. The dough should be crumbly but malleable.


Turn the dough out onto parchment paper, divide in half, and use wet hands to shape each half into a flat disk.


Working with one half (or disk) of the dough at a time, sandwich the dough between two baking-sheet-sized sheets of parchment paper and use a rolling pin to roll out the dough to a thickness of about 1/4 inch. If the dough is too dry to roll out with out cracking, wet your hands and gently pat the cracked areas back together. Remove the top sheet of parchment and cut out hearts or the shape of your choice. I used a 2-inch-tall, ripple-edged, heart-shaped cookie cutter.


You can either carefully transfer the hearts to a parchment-lined baking sheet, or carefully peel up the excess dough, leaving the hearts where they are, and transfer that sheet of parchment to a baking sheet. Bake at 350 degrees F for 8 minutes. Let cookies cool on the baking sheet for 3-5 minutes before transferring to a cooling rack to cool completely.


Re-roll dough scraps and repeat, using fresh sheets of parchment as needed. Repeat whole process with remaining half of dough.

To prepare the filling, beat the cold butter along with a pinch of salt until smooth. Add the vanilla and powdered sugar and beat till well-mixed. The mixture should be thick, white, and almost dough-like. Beat in the melted chocolate.


Turn the filling out onto a sheet of parchment paper and divide in half.


Working with one half at a time, roll the filling out between two sheets of parchment until it is between 1/8- and 1/4-inch thick. Use the same cutter you used for the cookies to cut out shapes of the filling. If you feel like the filling is not stiff enough for easily cutting out shapes, place the rolled-out filling (still between the sheets of parchment) on a baking sheet and chill in the fridge for up to 20 minutes.


Place a filling shape on a cooled cookie, top with another cookie, and press very gently to adhere.


Repeat with remaining cookies and filling.


Makes about 40 sandwich cookies.


These cookies were part of the 2012 Great Food Blogger Cookie Swap, which is a little like secret Santa for food bloggers. I shipped these cookies to three participating food bloggers, and I'll get to sample cookies from three different bloggers. This year, each participant paid a small sign-up fee, and all the money went to Cookies for Kids' Cancer. Not a bad way to celebrate the season!


Thanks for reading! Here's to Being the Secret Ingredient in your life.